Updated : 5/06/2019
Ideas on How to Wire your Camper van Conversion.
(also useful if you are thinking of buying a PVC and want to compare build quality)
Whether you have a Volkswagen T1, a Citroen H van or a Sprinter, wiring your Camper van will be more cost effective if you plan it well.
This is not sales based, we repair most Motorhome Charger systems from the UK, Germany, Italy, France, Holland, etc. We know what is on the market better than anyone.
More importantly we know what works and what breaks but we don't sell these kits, so this is independent advice.
Many people wire their Campervan piecemeal, they start with a Habitation area battery then add a split charge relay. Then a mains charger, then Lights, Gas heater blower controller, water pump, power monitoring, Solar charging of the Habitation battery, etc.
Each item tends to have it's own wiring, switches, fuses and control so by the end of the work you have several completely independent units with switches and fuses all over the van and little integration.
One thing often not built in is the ability for a 'one touch' isolation of every device from draining power when the van isn't being used. You don't need to go around turning everything off when you put the van away, just one touch shuts down all 12v.
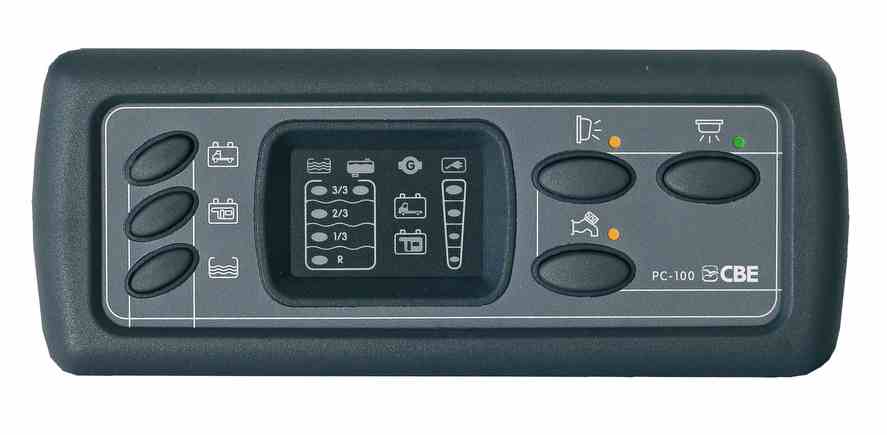
As an example this Display/Control Panel above contains most functions at just over £71 and the separate Fuseboard not only controls power distribution and battery protection, but also Alternator charging of the Habitation battery and Fridge control.
The CBE PC100 controls the Water Pump isolation, lights, Main Power, Water level display for both Waste and Fresh Water, voltage of Habitation area battery, Starter battery status (and charging), etc.
You don't have to wire them all in, but for £71 it is nice to know they are easy to add later if you you want to. See here for a supplier of a kit : https://www.grasshopperleisure.co.uk/cbe-pc100-complete-kit-315-p.asp
The CBE PC200 is a full LCD control panel that is slightly more expensive than the PC100 LED version above.
This is how the big companies do it, check out any quality, decent size motorhome and you won't find a separate 'Split charger' anywhere.
There are of course other options, but sadly, we think some are not fit for purpose.
One brand new 2018 Camper we saw had this Bonus PMS 3 unit on display inside the habitation area, it has to be on 'display' as the one piece unit contains all the controls.
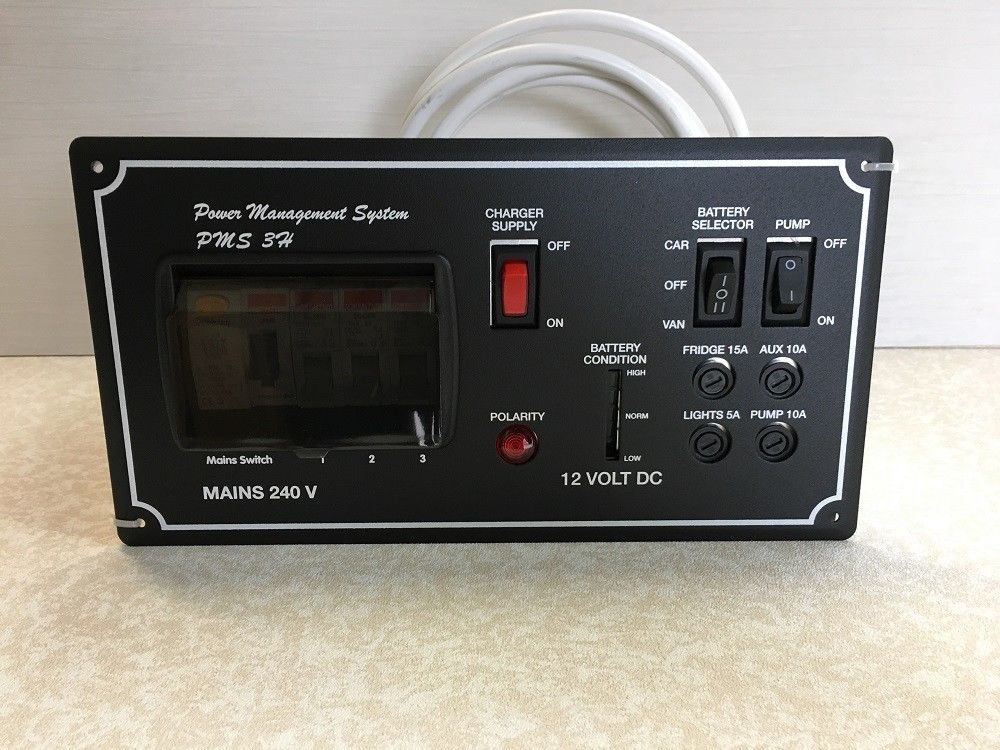
Why would you want to see the 230v RCD/MCB's? We hide them under the stairs in our Houses?
The unit's design is Caravan derived, note the battery select switch that states Car/Off/(cara)Van.
It has a poor 1980's technology, low powered Mains charger.
If you look at the unit it has limited fusing, a main power On/Off and a switch to control the Water Pump and that's it.
There is no ability to power off the Fridge separately, lights, Water level check, no decent battery voltage check, etc.
Which looks more expensive and professional? The stylish CBE Display or seeing an RCD box with tubular 'torpedeo' style fuses and switches that even a 1980's Ford Cortina would be ashamed of? When did any decent automotive manufacturer last use that type of fuse and ugly switch? As a result, hard to find?
You can see how much more attractive the 'modern' Sargent EC160 is below?
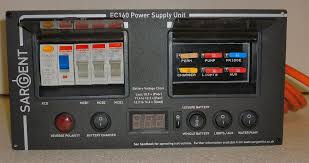
No?
I couldn't either but at least it does use proper fuses.
We also think there is a safety issue putting both 230v and 12v in the same steel box.
230v in a steel shelled body isn't the ideal, but to then mix 230v and 12v just isn't sensible.
The best Motorhome builders keep them separate and use insulated 230v plastic housings, for obvious reasons.
British Electrical regulations stipulate that 12v and 240v must not run in the same trunking/housing, clearly for safety reasons.
The two units above need to be 'on view' as they contain the switches that operate the devices, so imagine what all the 240v and 12v wiring will look like running into those two units?
You would need to make special provision to hide the wiring behind panels, etc Ideally hide the entire ugly things in a cupboard.
Many Converters install them hidden away with subsequent difficult access to the cables at a later date.
Conversely, on the the kit used in quality Motorhomes, only the LCD Display/Controller is actually on view, it's attractive and has only a single cable going to it. Very easy to locate almost any where, preferably on view as it looks so smart.
The photo below is of a Rapido Motorhome with the CBE 230v RCD/MCB (in a safe, separate Plastic enclosure) on the far left.
Next to that is a DS300 style 12v fuseboard unit that controls ALL the 12v - the Split charging, Fridge control, Fused power distribution, battery protection, etc, then next to that is a proper motorhome charger, all located below the Bed/Seats.
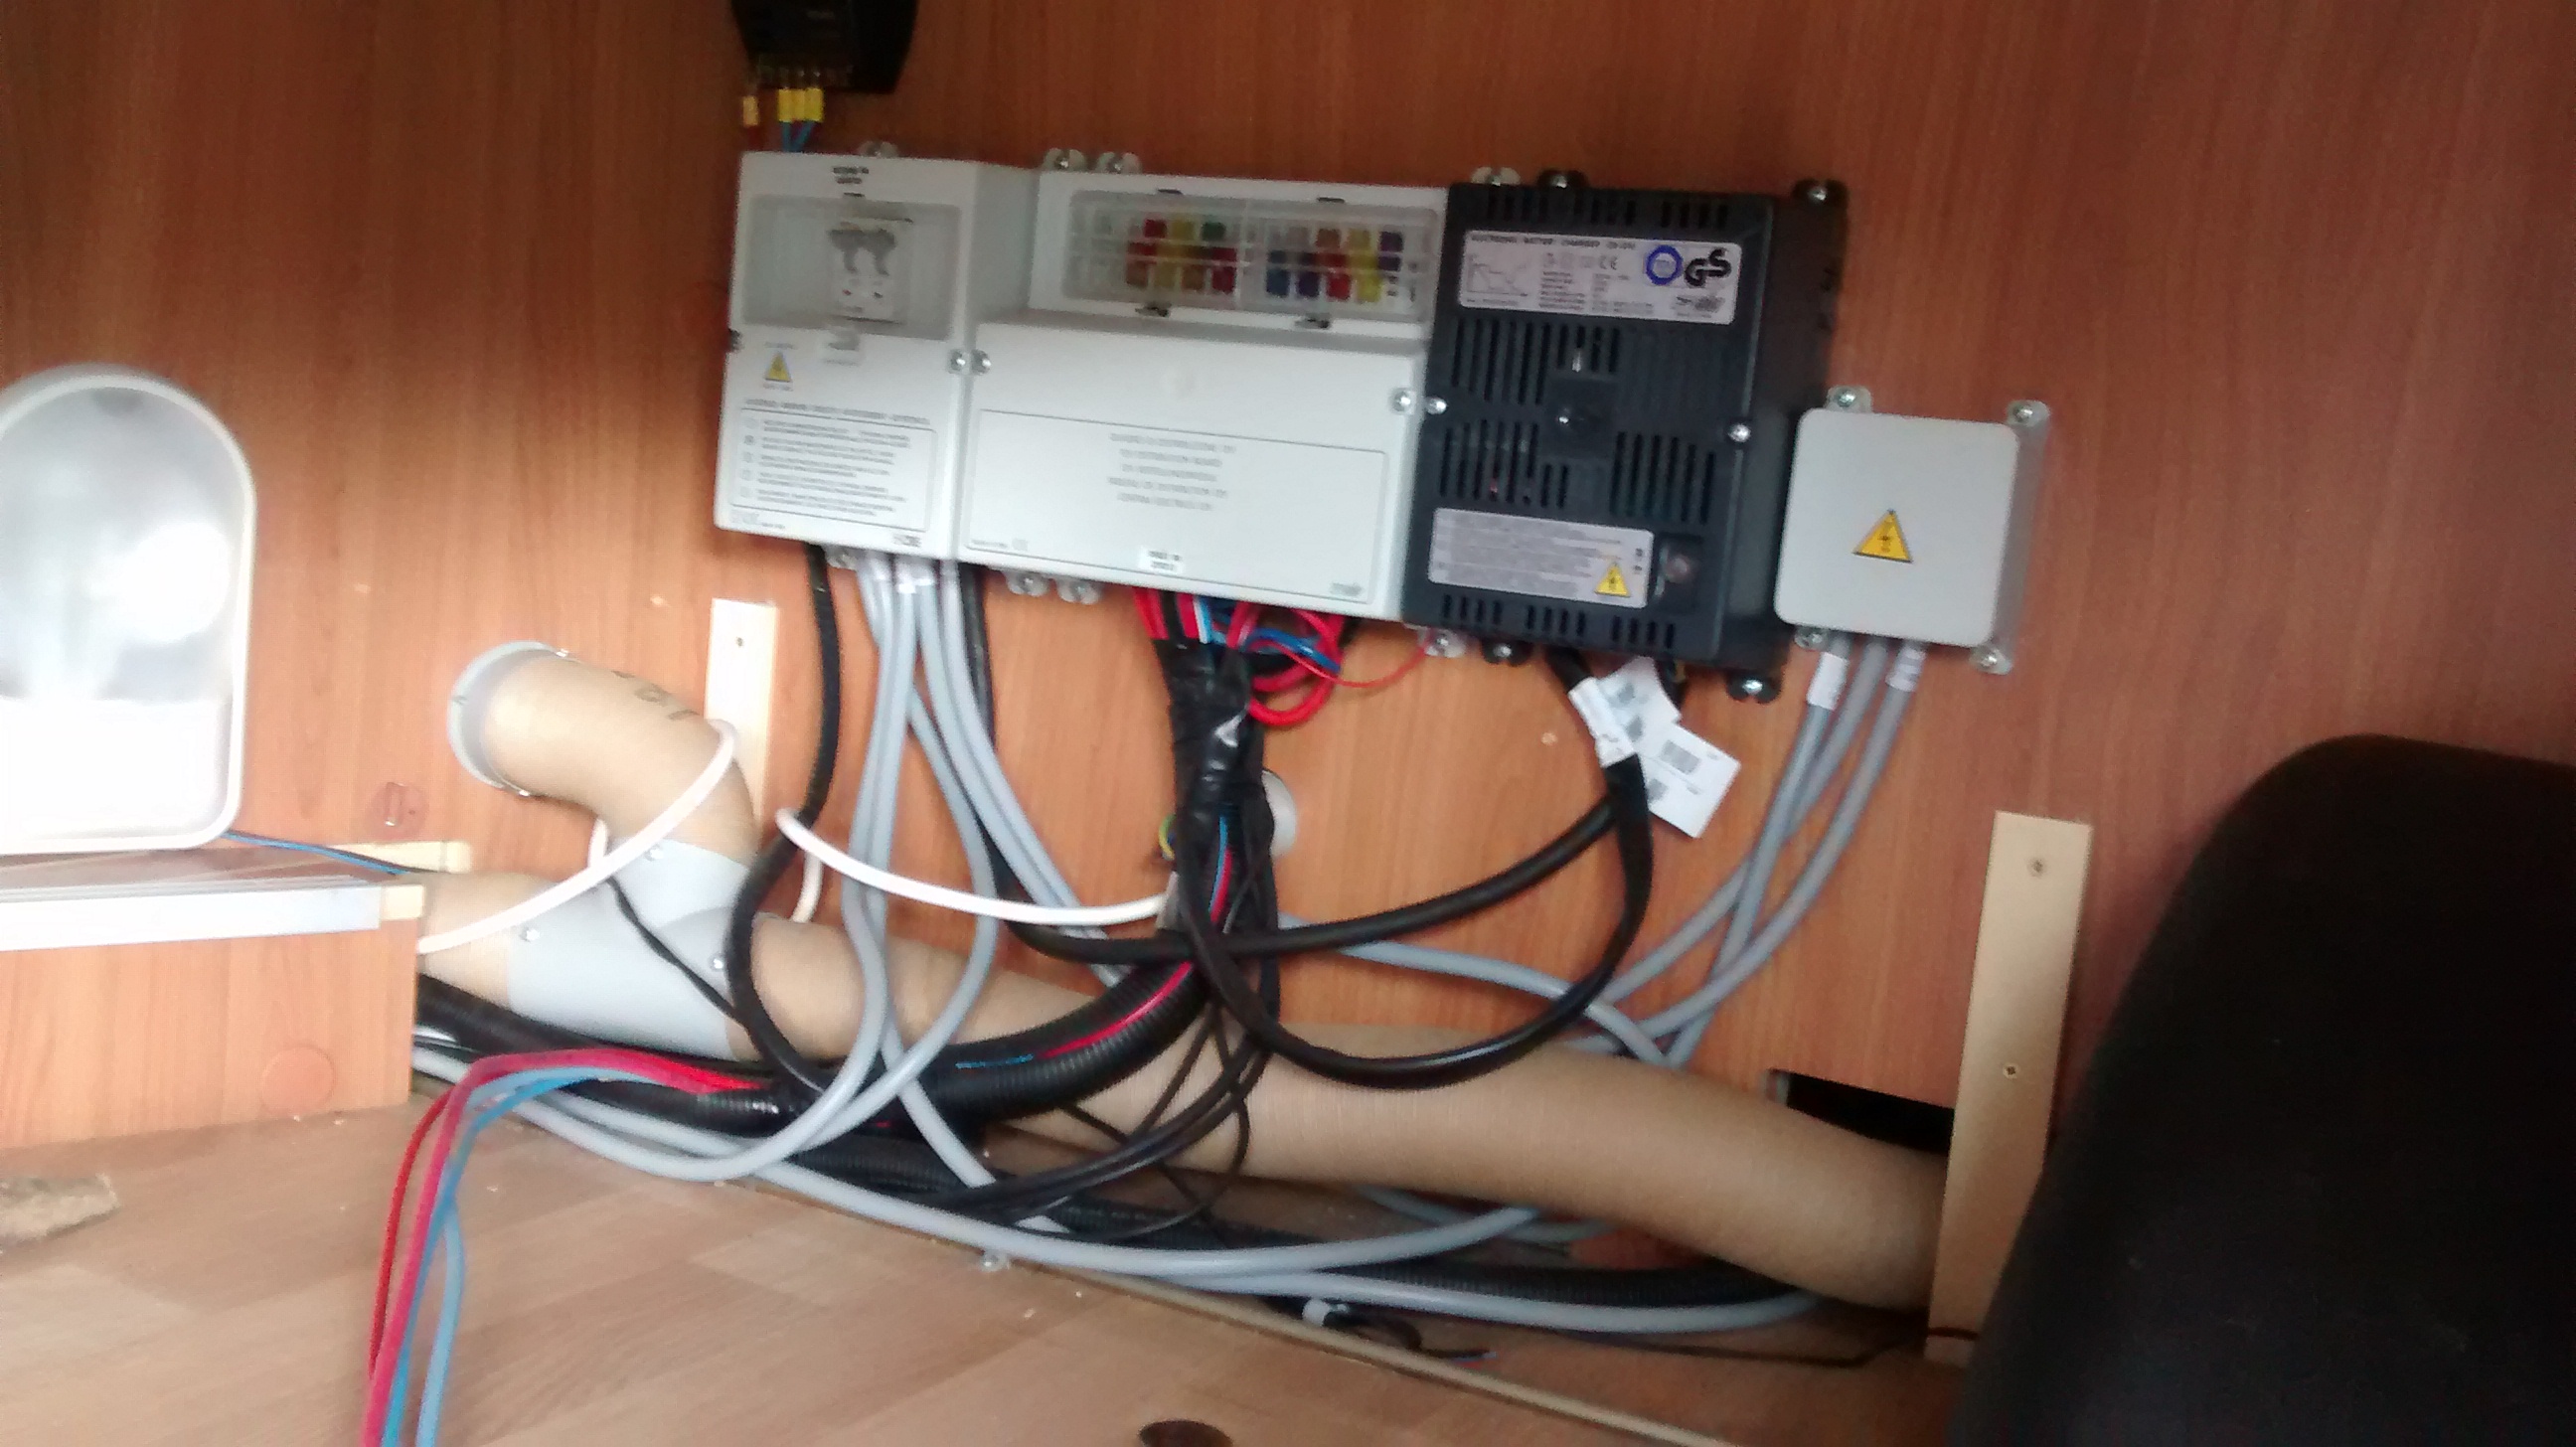
In the above installation the CBE wiring is a bit untidy, but at least it is out of sight under the bed. More importantly, it's easy to get to. Note how the cabling runs into the respective units via 'voltage' separated runs. By that I mean all the 230v grey cabling isn't grouped with the 12v which the likes of the Bonus and Sargent unit virtually force to occur.
I would have liked to have seen more 'armoured sleeving' to protect the cables in the above installation, but at least it's a 100 times safer than a 'single box' system.
If you box the wiring in, you may be sorry later. Remember that electrics and charging are amongst the most prolific issues on the motorhome Forums.
If you plan carefully from the start you can have an attractive, sophisticated 'single button' control system that may actually be cheaper than a piecemeal solution that will add value at sale time, because:
1. It looks expensive, giving the impression you did not penny pinch on any of the work.
2. When you come to sell, you maximise the resale value because it looks so good and not 'bodged'. A good integrated solution will be cheaper yet actually increase the vans value by far more than it cost to buy.
3. It is 'structured', has the look of a Professional Installation by someone who knew what they were doing.
4. The wiring is much simpler to install and understand so labour costs can be lower.
5. Saves space.
6. Easy to operate.
7. Easy for someone else to maintain.
8. Safer - If UK electrical regulations say not to run 12v and 230v in the same trunking/space, surely that is safety based advice aimed at keeping the wiring separated for a reason?
You will note that not one Motorhome Electronics manufacturer outside the UK mixes 230v and 12v power distribution in the same box.
Tips on Installation.
When fitting the equipment, aim to get the Alternator charging wiring path as short as possible for maximum charge and minimum voltage drop.
Overlong cables, unnecessary connectors, etc. can reduce the voltage at the Habitation batteries by a significant amount. When even a voltage drop of just 0.5v can cause the Alternator charge rate to be little more than a 'Trickle' charge 13.9v.
We think the ideal is to try and create a 'triangle' of Starter battery, Power Controller/CBE DS300 unit and Habitation battery all grouped together as close to the front of the vehicle as you can, as that is where the Alternator is.
On a Fiat Ducato/Peugeot/Citroen X250 base vehicle, the Starter battery is under the floor below the passenger's feet, so fitting the charging/power unit and 2 x L5 sized habitation area batteries under the front seats is just about ideal.
Use really decent sized 16mm cable (minimum) for all Alternator charging cabling, or two smaller 10mm cables, whichever suits you best.
The cabling may only ever take 50amps, but should be sized for at least double that to ensure voltage drop is zero. It is absolutely vital for fast Alternator charging of the habitation batteries that the cables are thick and as short as practical with minimum connectors.
Take the Fridge feed from it's own point on the Alternator wherever possible.
If the batteries and Control Unit are located close together in this way, the charge rate can match that of an expensive B2B, which you obviously won't need.
The CBE Power Controller kit is often mounted on a wall, like in the Rapido motorhome picture above, but works equally well mounted on it's back. A good idea is to fit a sliding wooden 'draw' type base under the front seat and mount the Power Controller to this. That way the electronics can usually be slid out for maintenance. Allow good ventilation to keep things cool.
Fit the 230v RCD box well away from the DS300 12v Power Controller and as close as possible to the Electric Hook Up (EHU) point where it enters at the back of the vehicle. The 2.5mm (not 1.5mm) 16amp 'unprotected' cable from the EHU socket to the RCD should be as short as possible for safety.
You can see that the ideal places to mount the 12v box (at the front) and the 230v (at the back where most 230v/16A EHU 'input' sockets and 13a 'output' sockets are located) is at odds with them being grouped in a single steel cabinet.
With the Sargent EC160 and Bonus PMS type units, mounting them at the front for ideal Alternator charging is almost impossible, but in any case would result in a longer than ideal 230v, '16 amp' feed into the RCD.
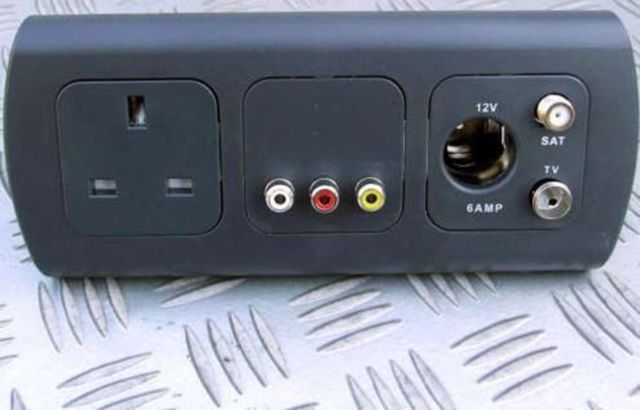
CBE don't just supply the control electronics, Fridge Controller, etc. but make everything electrical for a Camper conversion/Motorhome. From the 13a sockets to the TV Ariel socket, they all match.
Integrated and 'Professional'. This image below is an example of a CBE 13a socket, Audio and Tv 12v Power + antenna for both satellite and Digital.
MAINS CHARGING.
The CBE system has a very sophisticated charger that, unlike other kits such as the crude Sargent EC160, is both powerful yet won't overcharge the battery.
Some of the Sargent Campervan electric kits include a feeble 10amp, 13.5v power supply (not a multi stage battery charger, but one with it's roots in the 1980's) that will take a month of Sundays to get a big battery fully charged, if it manages to do it at all.
When the engine is started, the Sargent units shut down all of the habitation area electrics, so you can't see if the Habitation area battery is charging from the Alternator.
But the CBE units allow everything to work normally, regardless of whether the engine is running or not. Very important as it allows you to start the engine to boost the battery, just like a Generator does, and still see the last minutes of the Rugby/ Formula 1 while the engine is running.
With the British built units, as soon as you start the engine, the TV, lights and all electrics power down. This is unique to the UK, no other manufacturers from around the world do this.
One other odd quirk with the Sargent EC160 and Bonus style boxes, they don't simultaneously mains charge the Starter battery and Habitation area battery. You have to manually select the Starter battery at the control panel to charge it and can only charge one or the other.
The CBE mains chargers are more sophisticated and like the best Motorhome units, will charge both batteries simultaneously and automatically, but give priority to the Habitation area battery.
The CBE is also modular, if any main part breaks, like the DS300 main power controller unit, a replacement from Grass Hopper Leisure is just £79 and easy to buy.
The display is only £71, the entire mains RCD/MCB is only £79, etc.
If you get an issue with the Sargent Ec160, in a worst case, you have to buy the entire assembly at well over £200.
If you think that is expensive, something like the more up range Sargent EC328 costs £332 with display, see here : https://sargentltd.co.uk/shop/product/ec328_power_supply_unit/143
The Sargent 'all in one box' approach can make fault finding difficult and expensive.
The Sargent and Bonus inbuilt 'chargers' that are built into the single box housing are so under powered they are also prone to failure from overload.
The CBE kit is designed for easy, long term, low cost maintenance.
We think it is the best Campervan system by far and why it is also used by many Motorhome builders.
Obviously combining 230v and 12v into a single unit is going to save money and we suspect that is why this approach is taken, putting accounting before safety. You will find that even some 'professional' van converters don't put the customer first when it comes to electrics and safety, but profit. Have a look around at some of the 'Big names' in the business to see how primitive some electrics can be.
We think one of the best guides to the quality of a professional Campervan conversion is the electrics implementation. The electrics are the Heart of a motorhome/Campervan, scrimping or bodging here is very visible and indicative of poor quality implementation of everything from furniture to the Gas install.
Things to consider in your plan:
1. Most Camper vans do not get used every week so Starter batteries can get a bit depleted. Consider a unit that will charge both your Starter and Habitation batteries simultaneously.
2. Consider a unit that has a Solar Input port that will automatically distribute the charge to Starter and Habitation area batteries so you don't have the complexity of wiring it to both. Just wiring it straight into the Power distribution/Controller box will ensure the wiring is simple, yet the charge gets to both batteries.
3. Water pump control : If you have a water pressure switch based solution you will be able to use standard taps without a micro-switch which simplifies the wiring enormously and means you save money on the taps. However in this type of system you need a pump isolation switch to deactivate the pump when the tank runs dry or for maintenance.
4. How will you control the Fridge when running on 12v/Gas/230v mains?
Modern Fridges require 3 x 12v supplies, one to the 12v element when running off the Alternator, an 'Alternator spinning' D+ signal supply and a continuous 12v 'control' supply for the module that controls the temperature when running on Gas and 240v.
Without this permanent 12v control supply the fridge will not work on Gas, 240v or 12v Alternator.
Ok so I know you are only building a day van and don't want a Fridge but think about the next person who buys it. Including it in the plan now will cost just a few pounds but add a lot more to it's resale value. The CBE has built in Total Fridge control.
See our new web page on 12v compressor Fridges. These can draw so much power over a day that keeping the battery charged can be a challenge, especially in the cooler months, when Solar might deliver a lot less power.
A coolbox can also draw a lot of 12v power over a 24 hour period, most of the bigger ones can discharge a battery in that time. We would suggest you calculate very carefully?
5. A Space Heater, such as Propex, will require 12v supply for gas ignition and the blower motor. You might also want to consider thermostat control of the Blower as this can save significant 12v power by switching to slower speeds/off when up to temperature.
12v power will be the thing you most run short of, so maximise every milliamp.
6. Kitchen sink/shower Water Heater
7. Tank level display. A prospective future buyer may be impressed it has the potential to be added, even if van doesn't actually have any tanks yet.
8. Battery condition/Life left/Alternator Charge current/mains charge current monitor, etc. Don't underestimate the importance of this as it is the only way of calculating what power is left in the battery and that everything is working as expected. That is key to long battery life.
Monitoring power usage or diagnosing issues requires information up front. If your system supplies this info, you can stop faults developing and fix them before they become a major issue.
A battery 'guide' display that just says 'Good/average/poor' is pretty much useless if you want to maximise battery life.
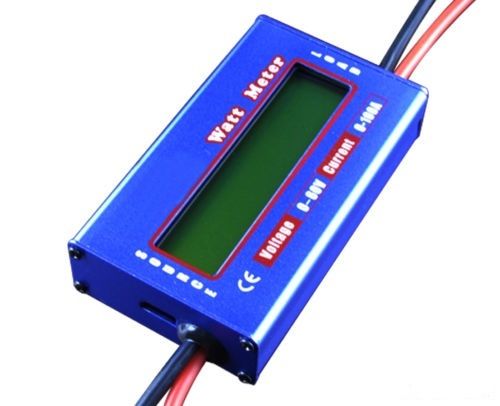
We suggest you fit a £7 Wattmeter as it displays amps, volts, Ah, Watts, etc.
Great for wiring next to the battery to let you see how many Ah you use each day/week, etc.
Wiring another into the Solar feed lets you see how much Solar power you harvest in Ah per day or week, see the Solar power pages for more info.
Very easy to wire in, search for Wattmeter on ebay. Beware of some of other units as they are not so easy to wire up.
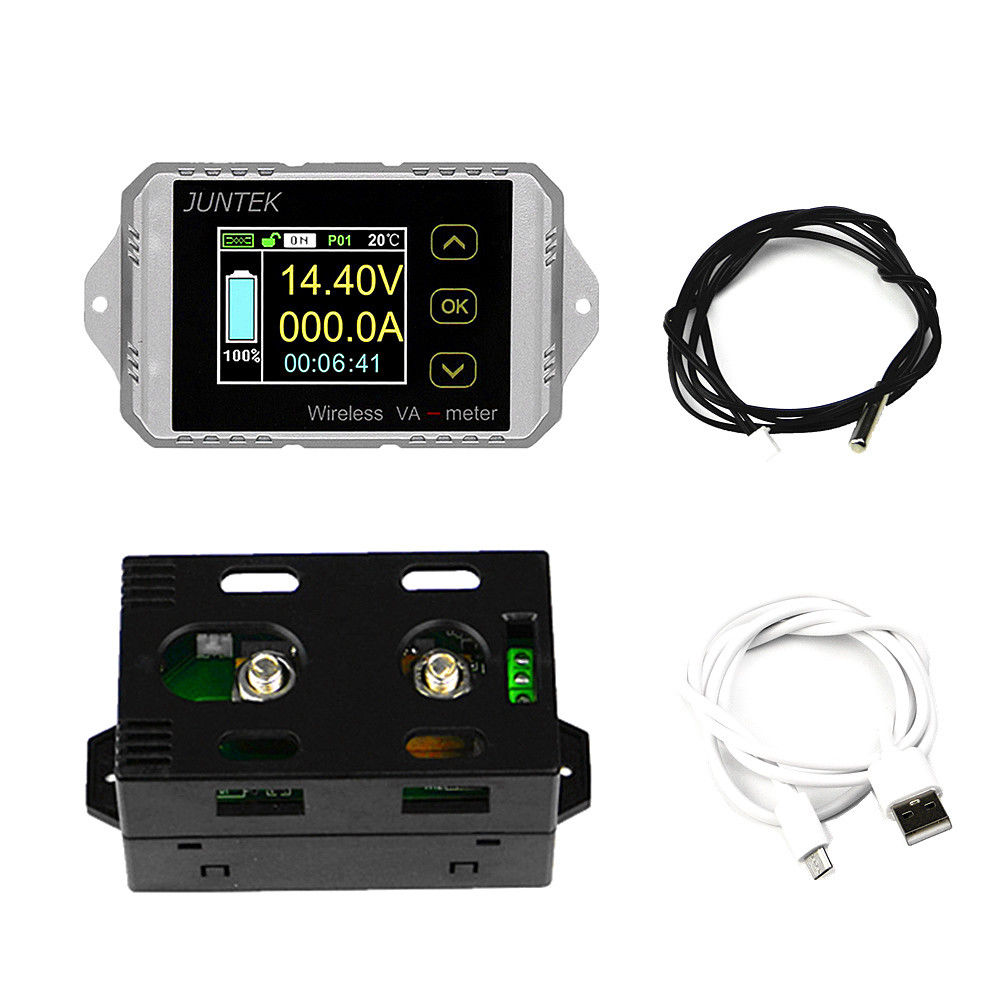
This unit below costs slightly more but is far more sophisticated and the wireless LCD Display can be located any where in the vehicle, like on the dashboard so you can monitor the Alternator charge rate as you drive. The LCD Display uses Wireless technology to communicate to the 'main' unit which locates at the battery terminal.
It is easy to fit and only about £20, try ebay.
Lots of companies can supply the CBE kit, Grass Hopper Leisure have given us great service with a good reputation for after care. Their other website, Rainbow Conversions, contains more info on the CBE kit which is well made, reliable, light weight, compact, cheap yet full featured.
Manufacturer spares back-up from CBE is among the best.
We no longer support CBE equipment but last time we saw such a solution, prices were around £299 for a full kit : the LCD Display, Mains charger, 12v controller fuse board, Mains 230v RCD, etc.
When you think a decent dual Habitation and Starter battery charger will cost around £135 on it's own, £300 incl. isn't bad when it also includes 240v power as well.
Please don't fit a CTEK car style Car battery charger, like many seem to, and then wonder why the battery doesn't get fully charged and fails after 12 months, it's not the same thing at all as a proper Motorhome charger.
A proper motorhome battery charger is designed to fully charge a habitation battery AND the Starter Battery simultaneously, when required without either overcharging or degrading the battery. Have a look at the web page How does a charger work?
CBE SOLAR REGULATOR
The one bit of CBE kit we don't like is the Solar regulators, they are poor efficiency, low technology regulators.
The Votronic MPPT can put more charge into the batteries than a CBE Solar Reg. The Votronic is so superior to the very poor CBE device if you are charging using the latest wet batteries can effectively increase the Solar array by 60% over the CBE version.
When you get to thinking about Solar, have a look at our 'Solar Hints and Tips' webpage. We used to install Solar but don't any longer, so the Solar webpage, just like is one, is not about a hard sell.
Again it is just free help.
Voltage Sensing Relays.
A Voltage Sensing Relay (VSR) sometimes used for non-intelligent 'Split Charging' constantly monitors the Starter battery looking for it's voltage to rise above 13.2v as that would normally indicate the Alternator is charging the Starter battery, at which point the VSR will connect the batteries together so the habitation area battery also gets charged.


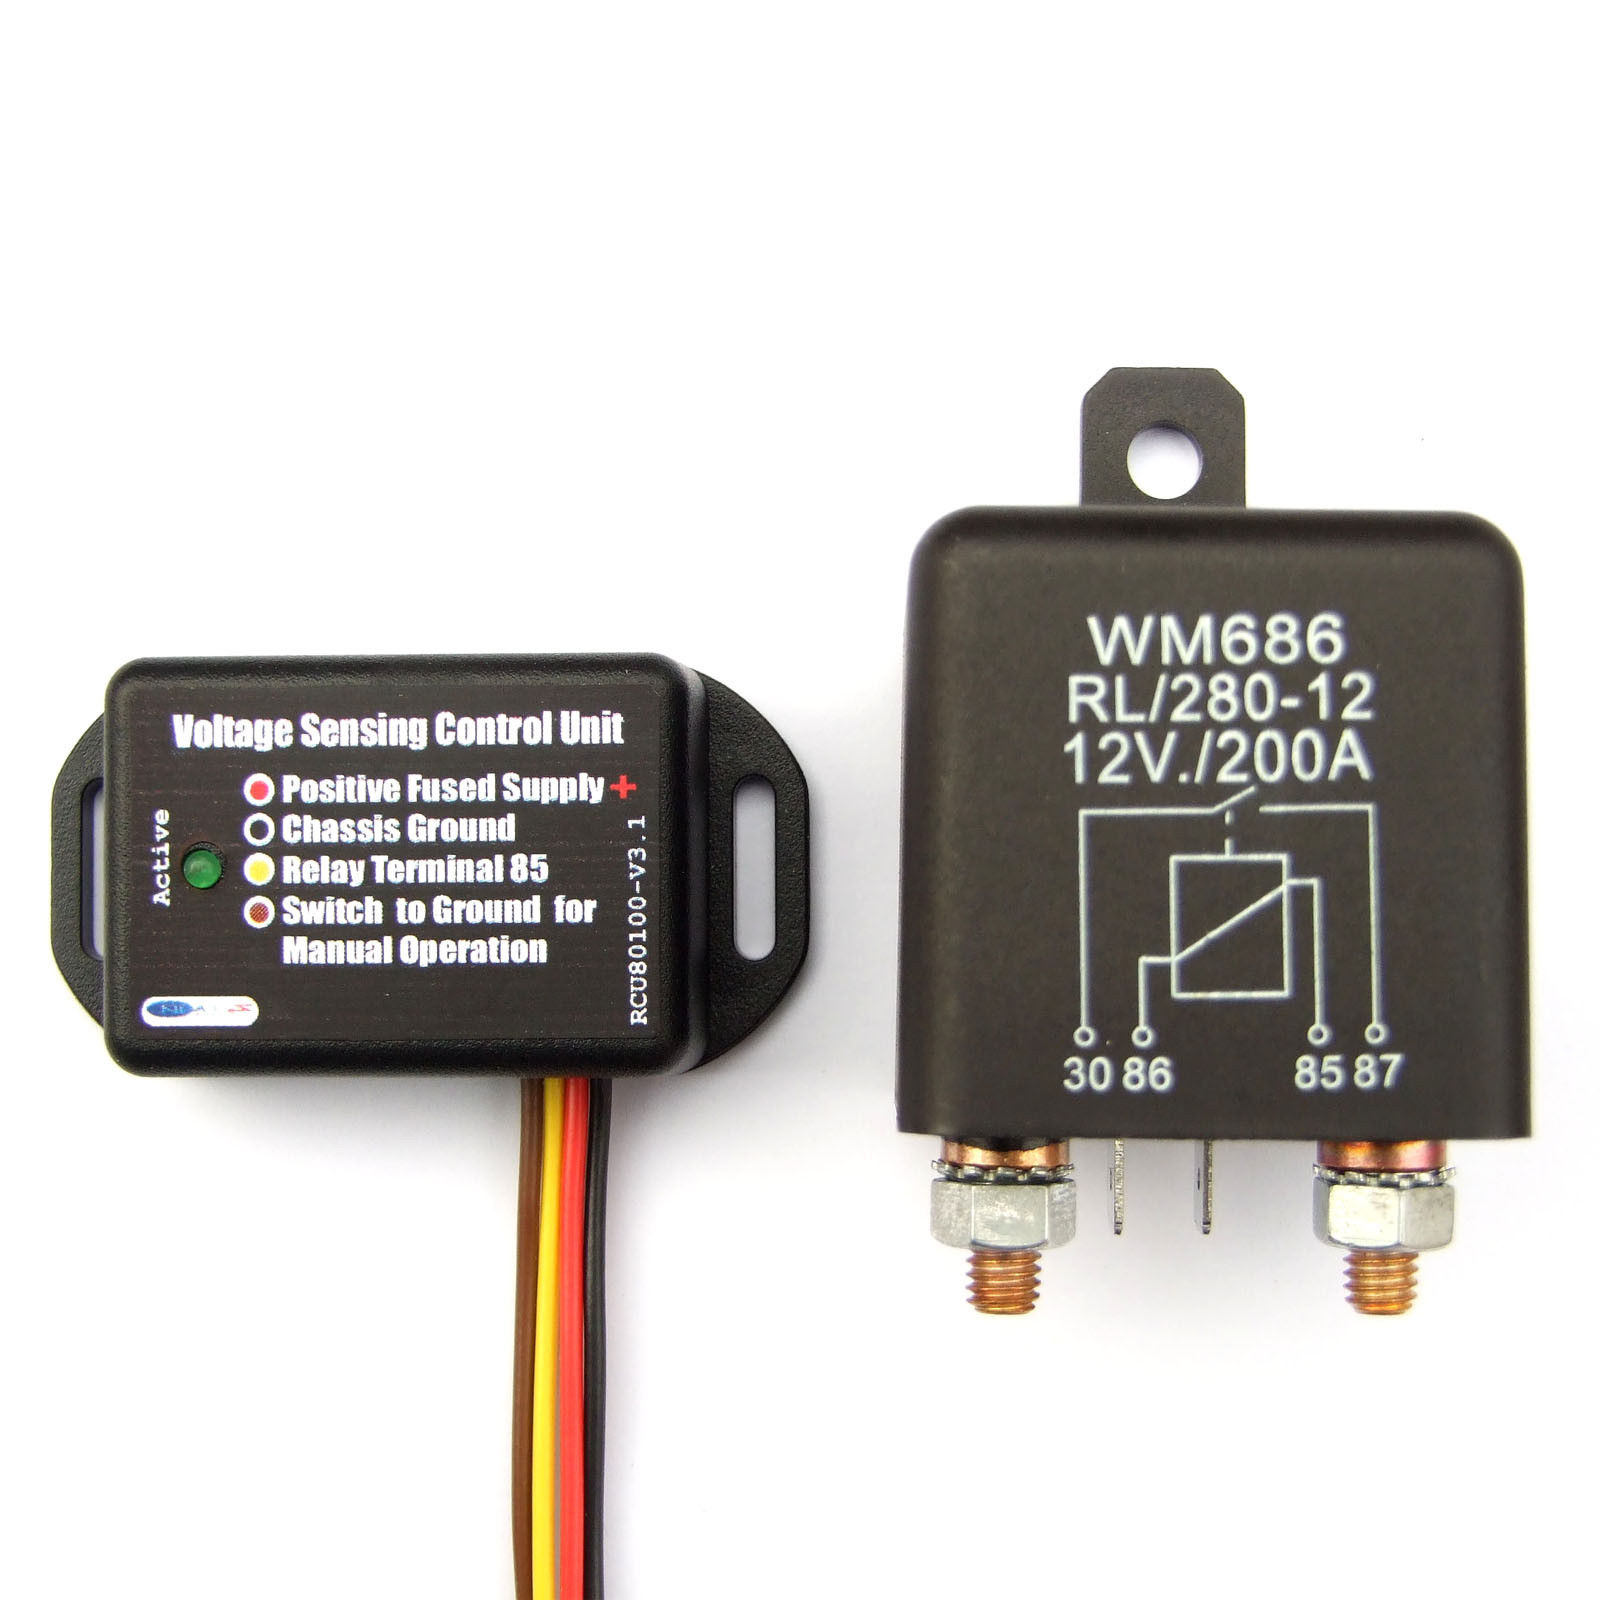
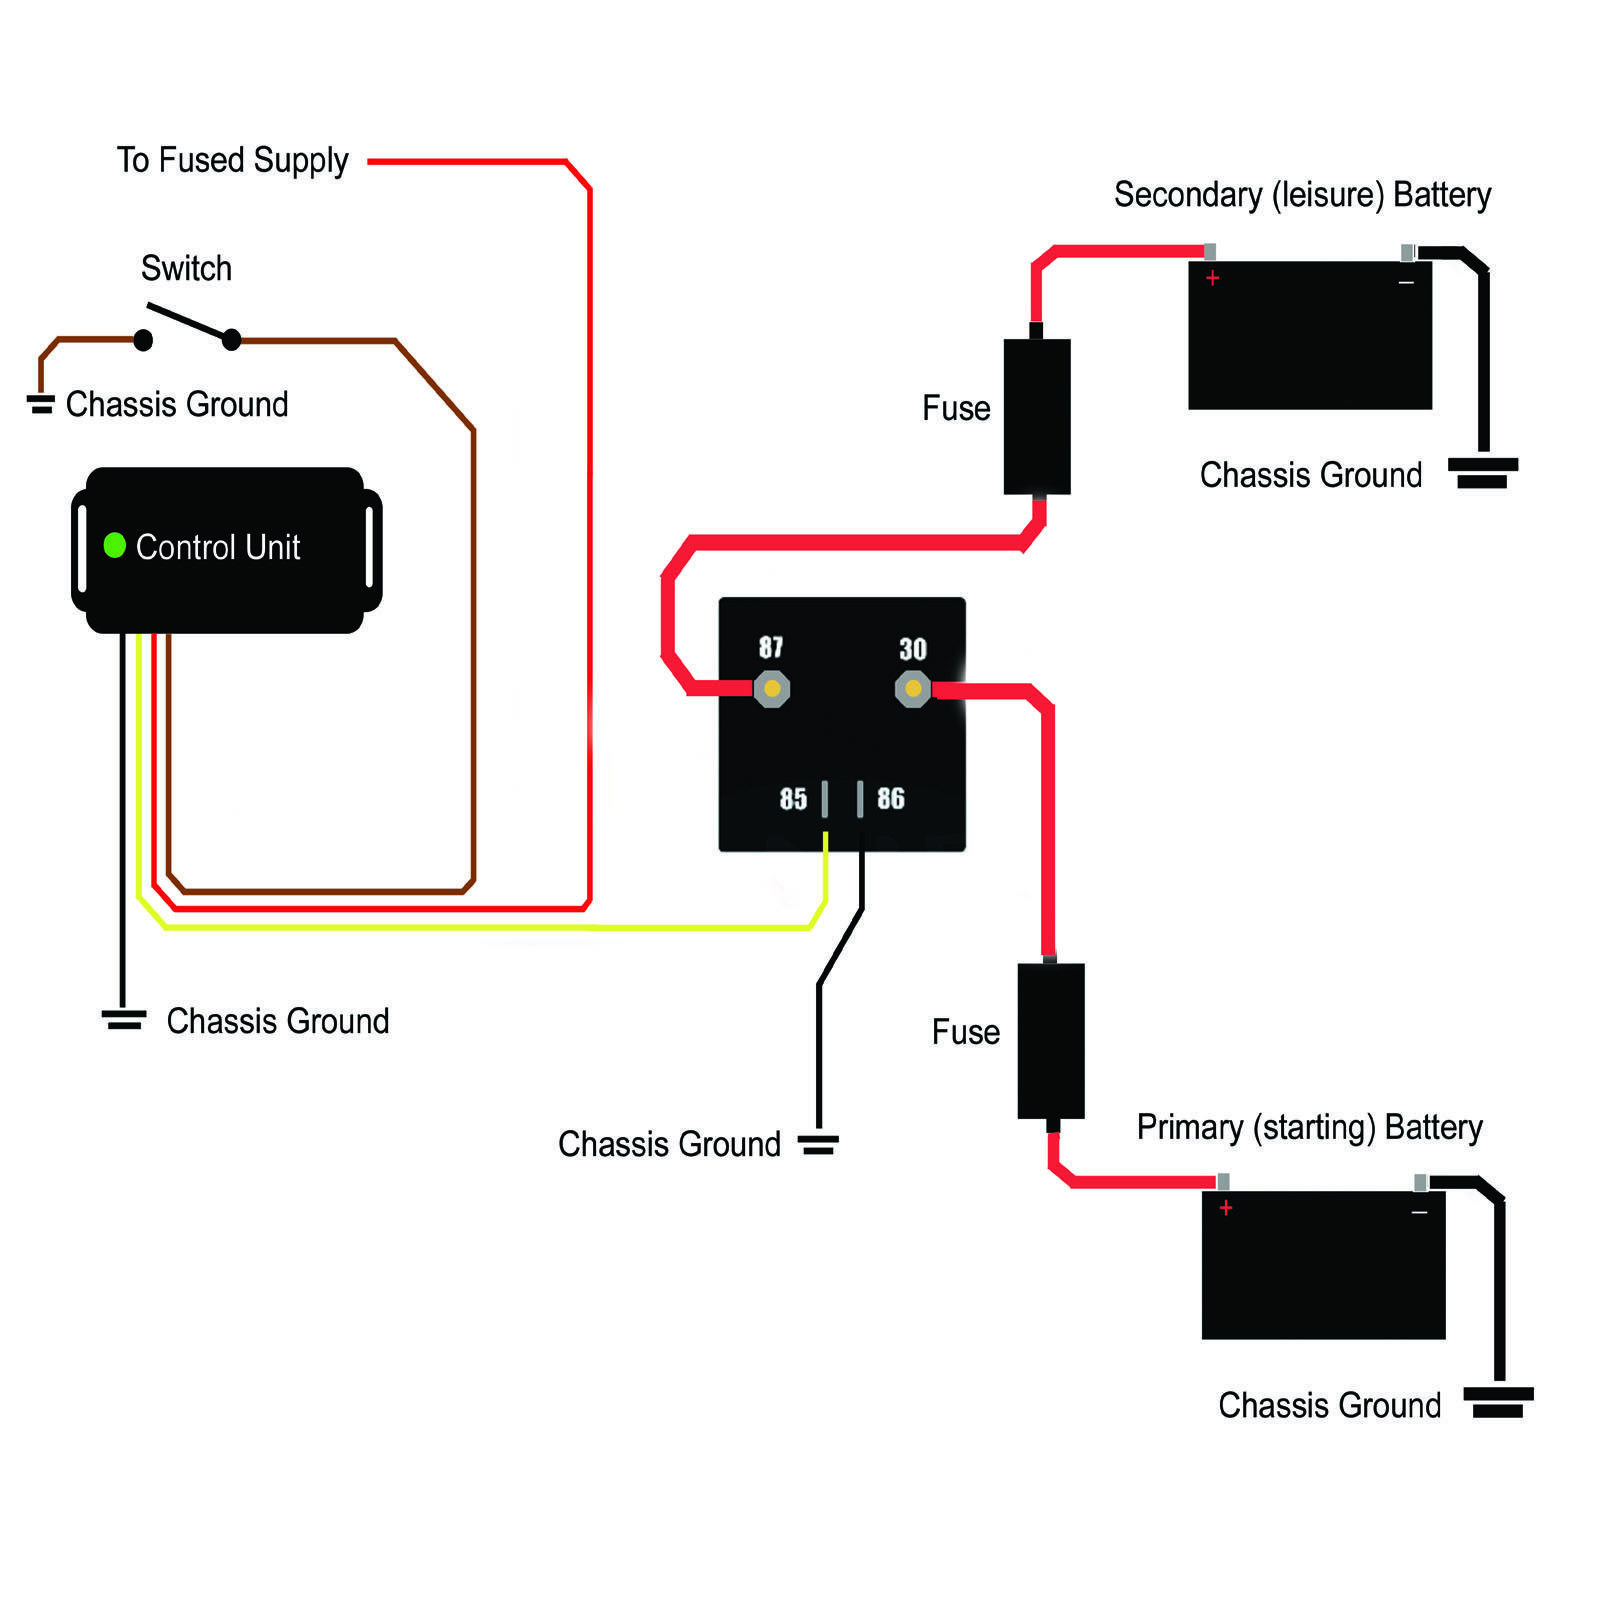
ZERO POWER DRAW WHEN 'OFF'.
An additional major advantage is that, when the 2 part VSR is wired as we suggest, it won't draw any power when the ignition is turned off.
A conventional VSR will always draw power 'looking' for the Starter battery voltage to rise above 13.2 so it can trigger. Because the 2 part unit above is only connected to the Starter battery when the ignition is on, there isn't the permanent current draw normally associated with the old fashioned VSR's.
Don't always listen to the Camper Van Converters, as you will probably see when you look around, some are still in the 1980's, see this real world example email -
"Allan, I have been reading your information on wiring your own Campervan Conversion and very interested in fitting the CBE PC100 kit but I have been told by Kirivans that it is not suitable for my model VW T6 2018 with stop start technology.
Could I have your thoughts on this subject. I would like to fit the CBE kit as I think it is a good product.
Kind regards
N. E".
Our reply :-
"Hello, any habitation electronics system will work with a Smart/Stop/Start or ANY type of alternator, all it needs is a Schaudt Intelligent Alternator Booster - WA 121525 (or similar) that fits into the Starter battery feed to the CBE.
Update 11/04/2019 : A Camper van converter sent out a new campervan to a customer only for the customer to find the vehicle had Euro6/Brake Energy Recuperation (just like the above 'VW T6 2018 with it's stop start technology') and the CBE based standard split charge unit wasn't charging the battery properly.
The company accepted responsibility to put things right, so they authorised a resolution.
On a Forum thread the owner posted an update on the 10th April 2019 that said :-
"Update - I have the Schaudt WA121545 from Germany. Wildax are aware and are keen to see how well it works. They have been using normal B2B's but have stopped doing so because of "issues": not sure what these are. Today I temporarily installed it in the van without the voltage and temperature sensors connected. With engine running at tickover I have a constant 14.41v at the leisure batteries (Banner Energy Bull). The battery voltage facility and charging of starter battery work on EHU with bypass switch "On".
Fridge is running OK on 12v with engine running but I wasn't prepared to take a temporary installation onto the open road so I can't be sure it is 100%.I reckon once I have a permanent installation with sensors included, this is going to be a class bit of kit".
That is real world user experience that the Schaudt kit works very well with CBE.
While the above mentioned Schaudt WA12145 unit isn't cheap, it is really powerful and quality and comes from the biggest Motorhome specific Charging electronics manufacturer in the World. It looks a bargain compared to the inferior CTEK 250 + Smartpass 120 which costs £229 + £249 = £478.
Note that the Smartpass 120 is effectively just a 'smart' VSR, it will not charge the batteries at 120 amps, but has the capability to "pass 120amps" which isn't the same at all.
The CTEK Smartpass 120 should not be used with modern batteries as it has the same issue using old fashioned battery voltage settings as the Durite VSR.
It will also trigger when the Starter battery is above 13.1v (which will happen when Solar starts charging the Starter battery) and only cuts out when the Starter battery drops below 12.8v, yet the best batteries 'rest' at near 13.0v, obviously meaning they will stay connected when they shouldn't be.
The superior Schaudt WA 12145 unit uses intelligent triggering that does not draw any current when idle.
Note that the Battery to Battery charger often proposed by 'experts' to address Alternator charging issues is the CTEK 250SA, but it only has a measly 20amps charge rate. For a typical twin battery set-up that is just 10 amps per battery so won't deliver the "faster charging" the advertising promises.
To give you an idea of how poor it can be -
Example of CTEK 250SA charge rate.
Take two 100Ah batteries discharged no more than the recommended 50%. That equals 50Ah per battery that needs to be put back. At 10amps per battery it will require about 6 - 7 hours of driving for the CTEK 250 to recharge the batteries. That clearly isn't 'Fast charging'.
Note the CTEK 250SA charger won't be able to maintain 20amps for more than about 30 minutes before it gets hot and backs down the charge rate. 20amps is it's peak, not continuous rating.
A one hour drive with a CTEK 250SA will put back less than 10Ah into each battery.
Example of Schaudt WA12145 charge rate.
Take the same two 100Ah batteries discharged no more than the recommended 50%, so the same 50Ah per battery that needs to be put back. The Schaudt will achieve 22 amps per battery to fully charge both batteries in a 2 and a bit hours of driving.
The Schaudt is less than the cost of the CTEK 250/Smart Pass equivalent, yet has more than double the performance and much greater functionality. It is specifically designed to boost the Alternator Voltage in this way.
Note the above charging times will depend on many things from battery technology, age, temperature, etc and are the best achievable, but the same assumptions/criteria are applied to both examples above.
Schematics and other CBE info below :


|
Schaudt WA121545.pdf Size : 743.071 Kb Type : pdf |
When you get around to choosing batteries, they are not all the same. There are Lead batteries and lumps of Lead that are better used to chock the wheels. Yet our 'best buy budget battery' is also one of the cheapest.
Do I need to tell you we don't sell batteries, so once again, independent advice?
See our Battery Technology webpage for more info.
Enjoy your Camper Van when you finish it.
On the right below is the Citroen H van my old company built a few years ago for the Wheeler Dealers TV program. It would have made a great Campervan.

Look out for it on Wheeler Dealers episode (season 12, episode 16), short video of it here : https://www.youtube.com/watch?v=XgD8Ejo-8jQ
It was bought blind by one of the producers while Ed and Mike were in America, They quickly realised it was too much for them, so it came to us to have everything fixed, We did the Paint, body panels, brakes, gearbox, welding, seats, the rear interior, brake lines, suspension overhaul, etc.
We even had to fit a replacement front sub frame as the original was cracked.
The van came to us as a wreck and we did the entire vehicle, including installing the Ford engine so Ed could remove it and refit it on the show. We then shipped it down to the WD studio.
Below you can see Richard outside our premises, driving the 100% finished article, onto the WD trailer to go back to the studio to finish filming. Note Mike's unique Trafficators already in place behind the Cab side.

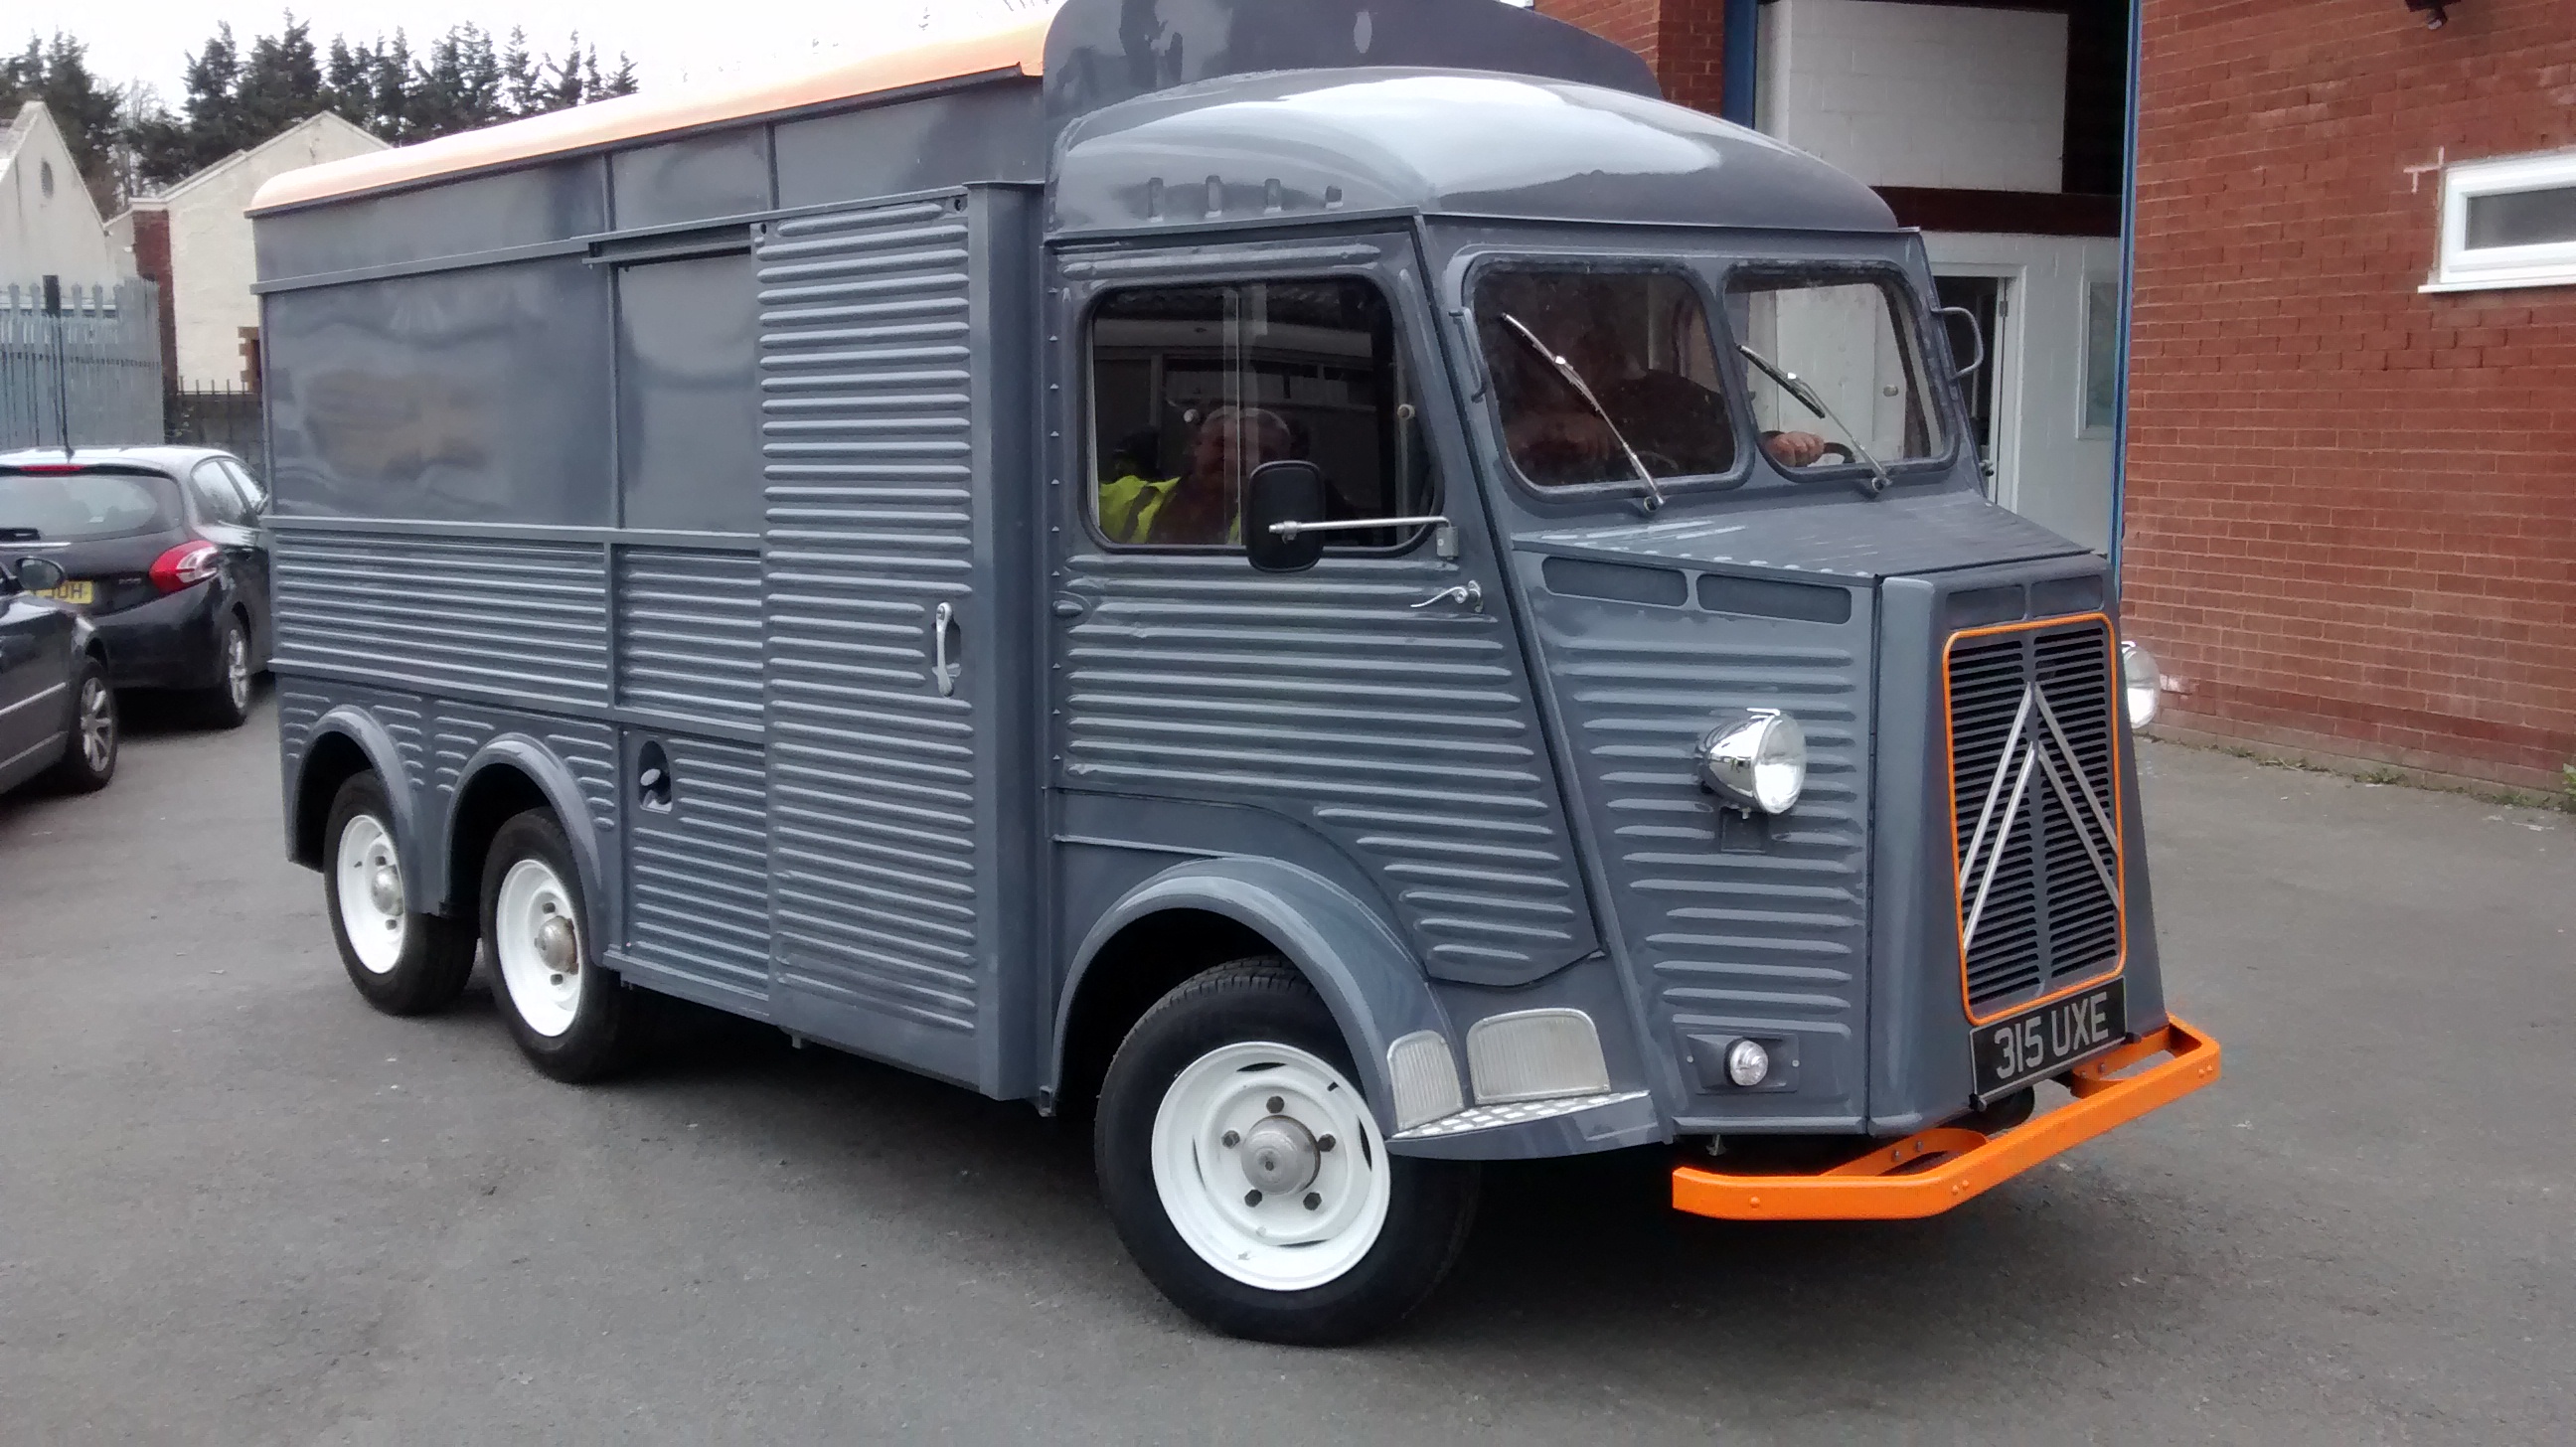
The horsebox below was bought from France as the basis for an 'outdoor bar' we built for events. We knew when we bought it the entire chassis was rotten and needed a full reconstruction so the plan was to rebuild it as a long wheel base vehicle.
This was it after loading up in France :
We cut off the old body, made up a new one and extended the 'chassis' by building a new one to create this :

Yes, it really is the same van as the stumpy Horsebox above, just had Richard's and Arwel's magic tools 'waved over it'.
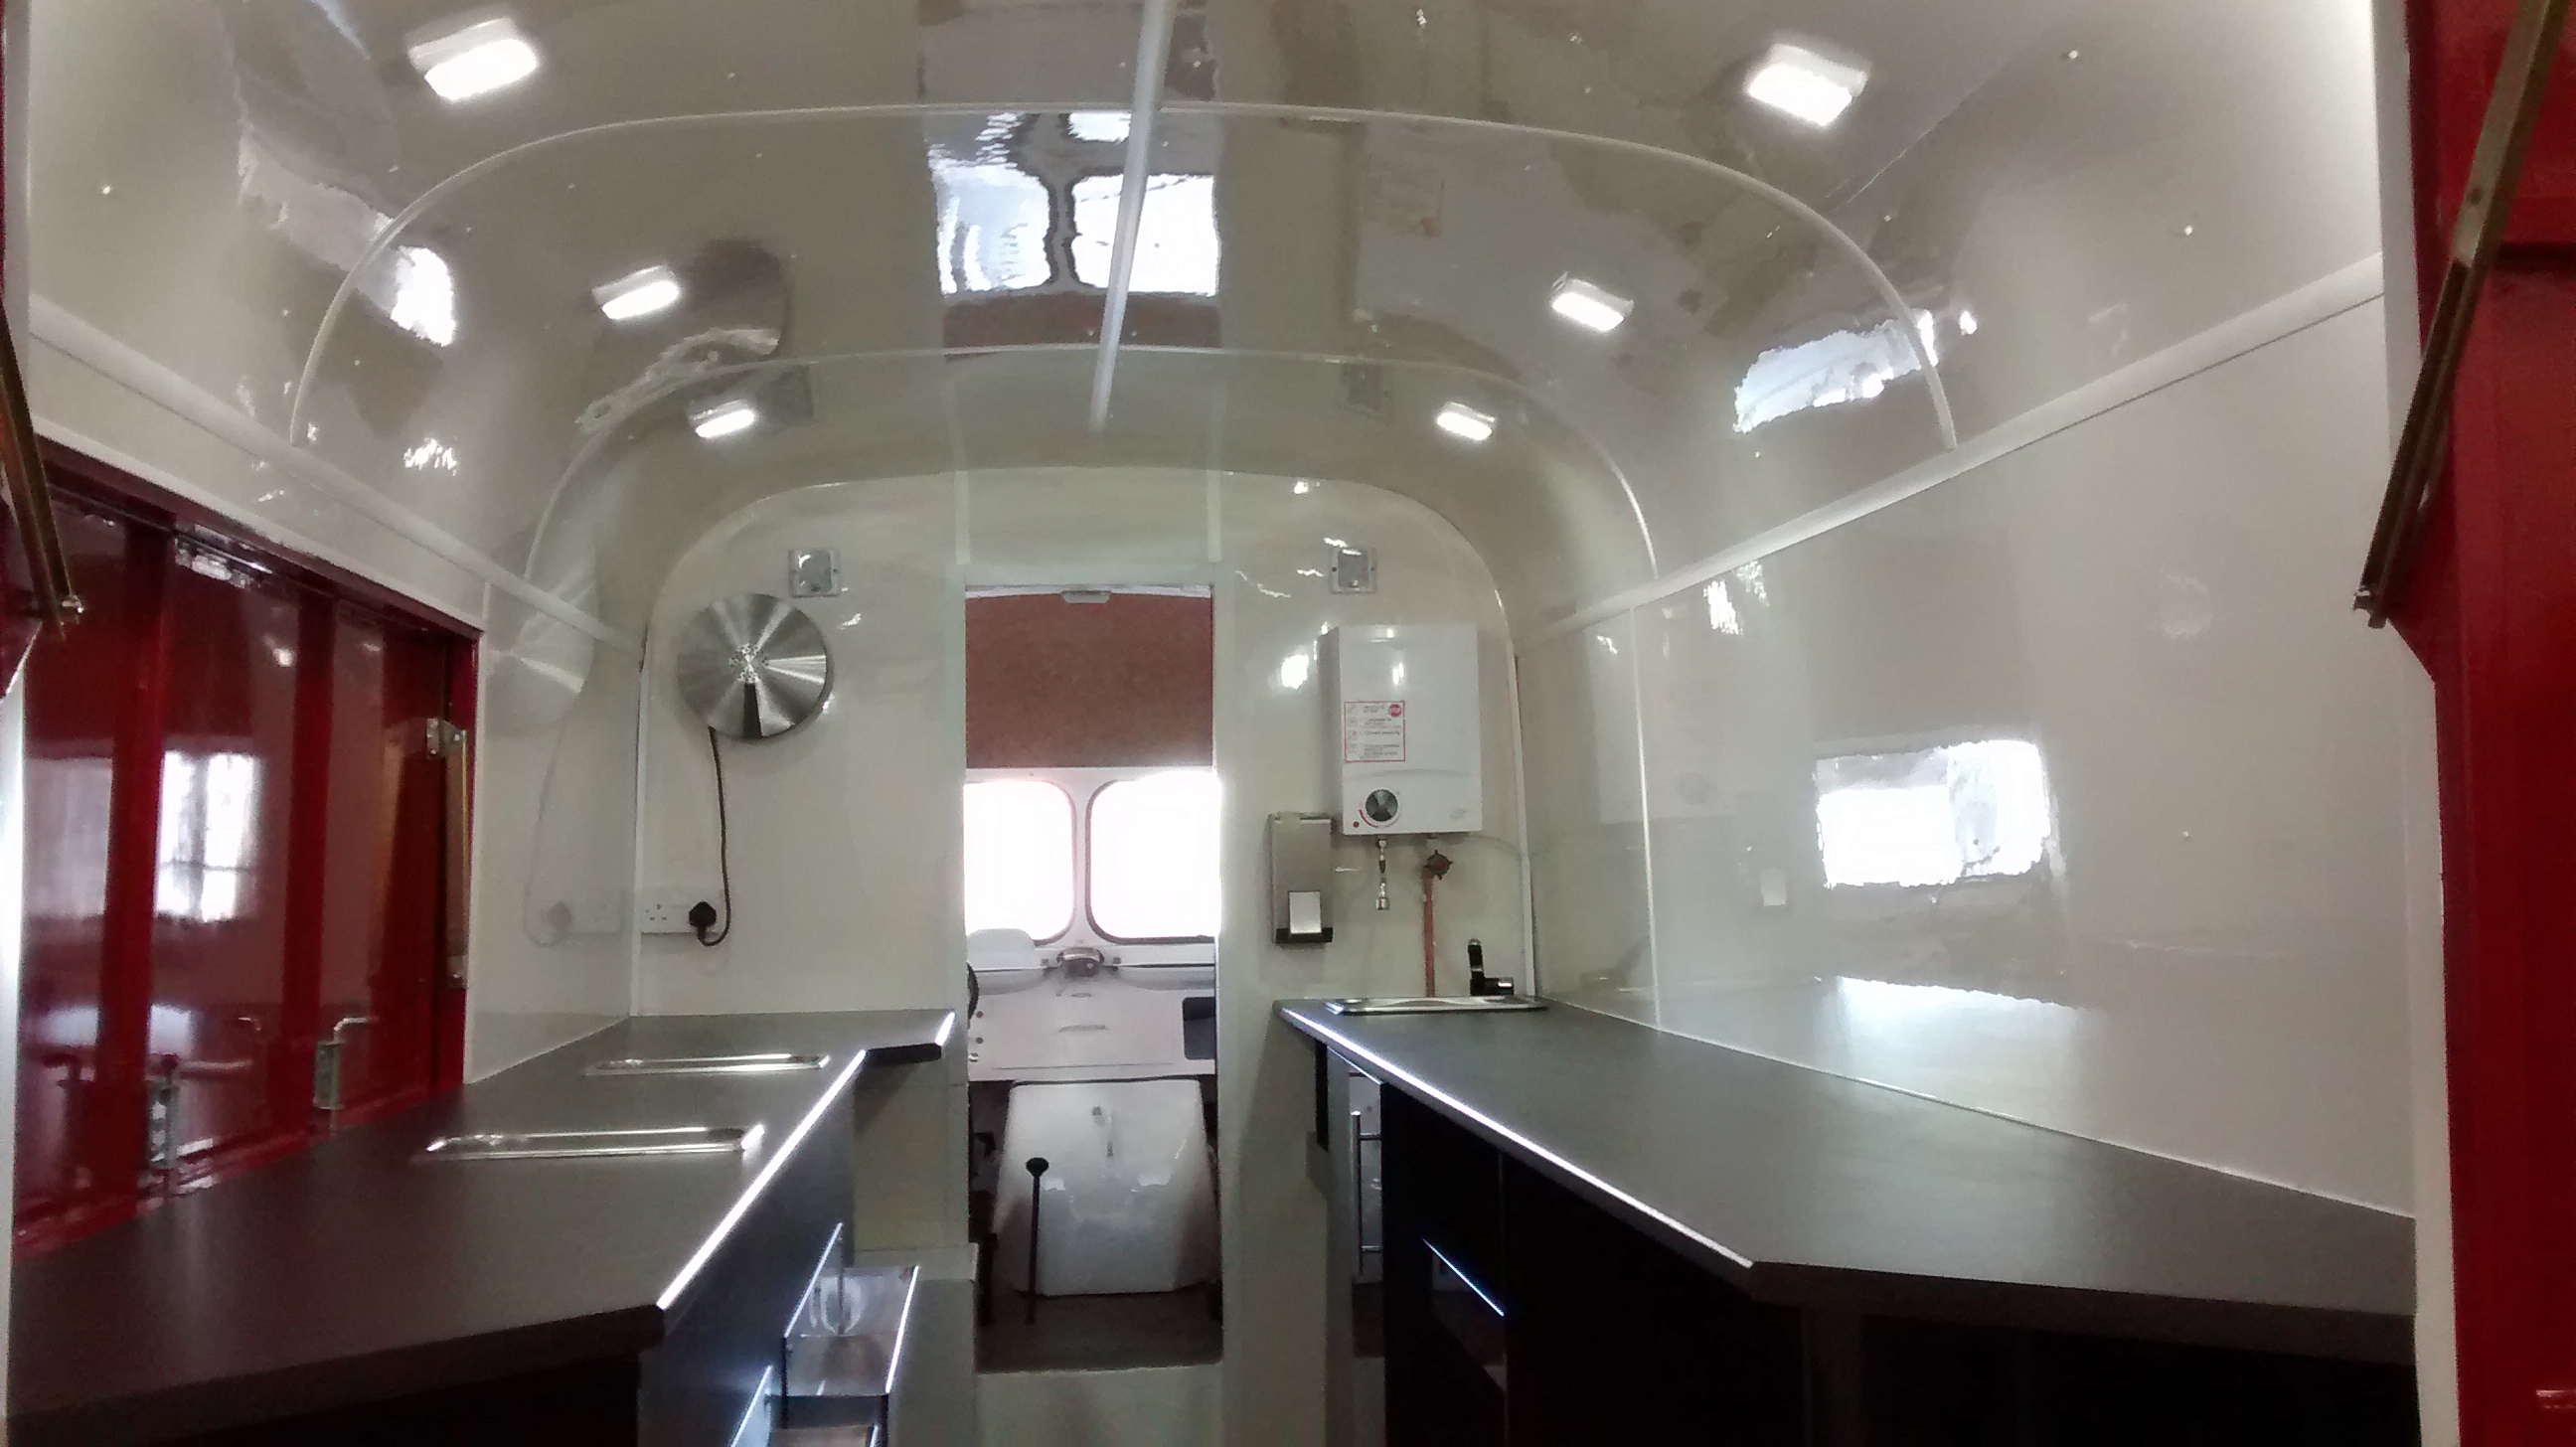
This photo below shows the interior of the same van after panelling by the team. All the work from rebuilding the body rewiring and plumbing in the sinks, all done in house.
Not only are we specialists in Campervan/Motorhome electrics, but you can see from above (and the Wheeler Dealers TV program that featured us) that we know about Interior construction, rebuilding engines, gearboxes, Brakes, Power Steering systems, Interiors, Starter Motors, Alternators, etc.
Not just the 'theory' but real world skills. In short every aspect of a Campervan or Catering vehicle.
So when a converter tells you, "They don't know what they are talking about", you can show them this webpage and our old website that is now looked after by Richard and Arwel.

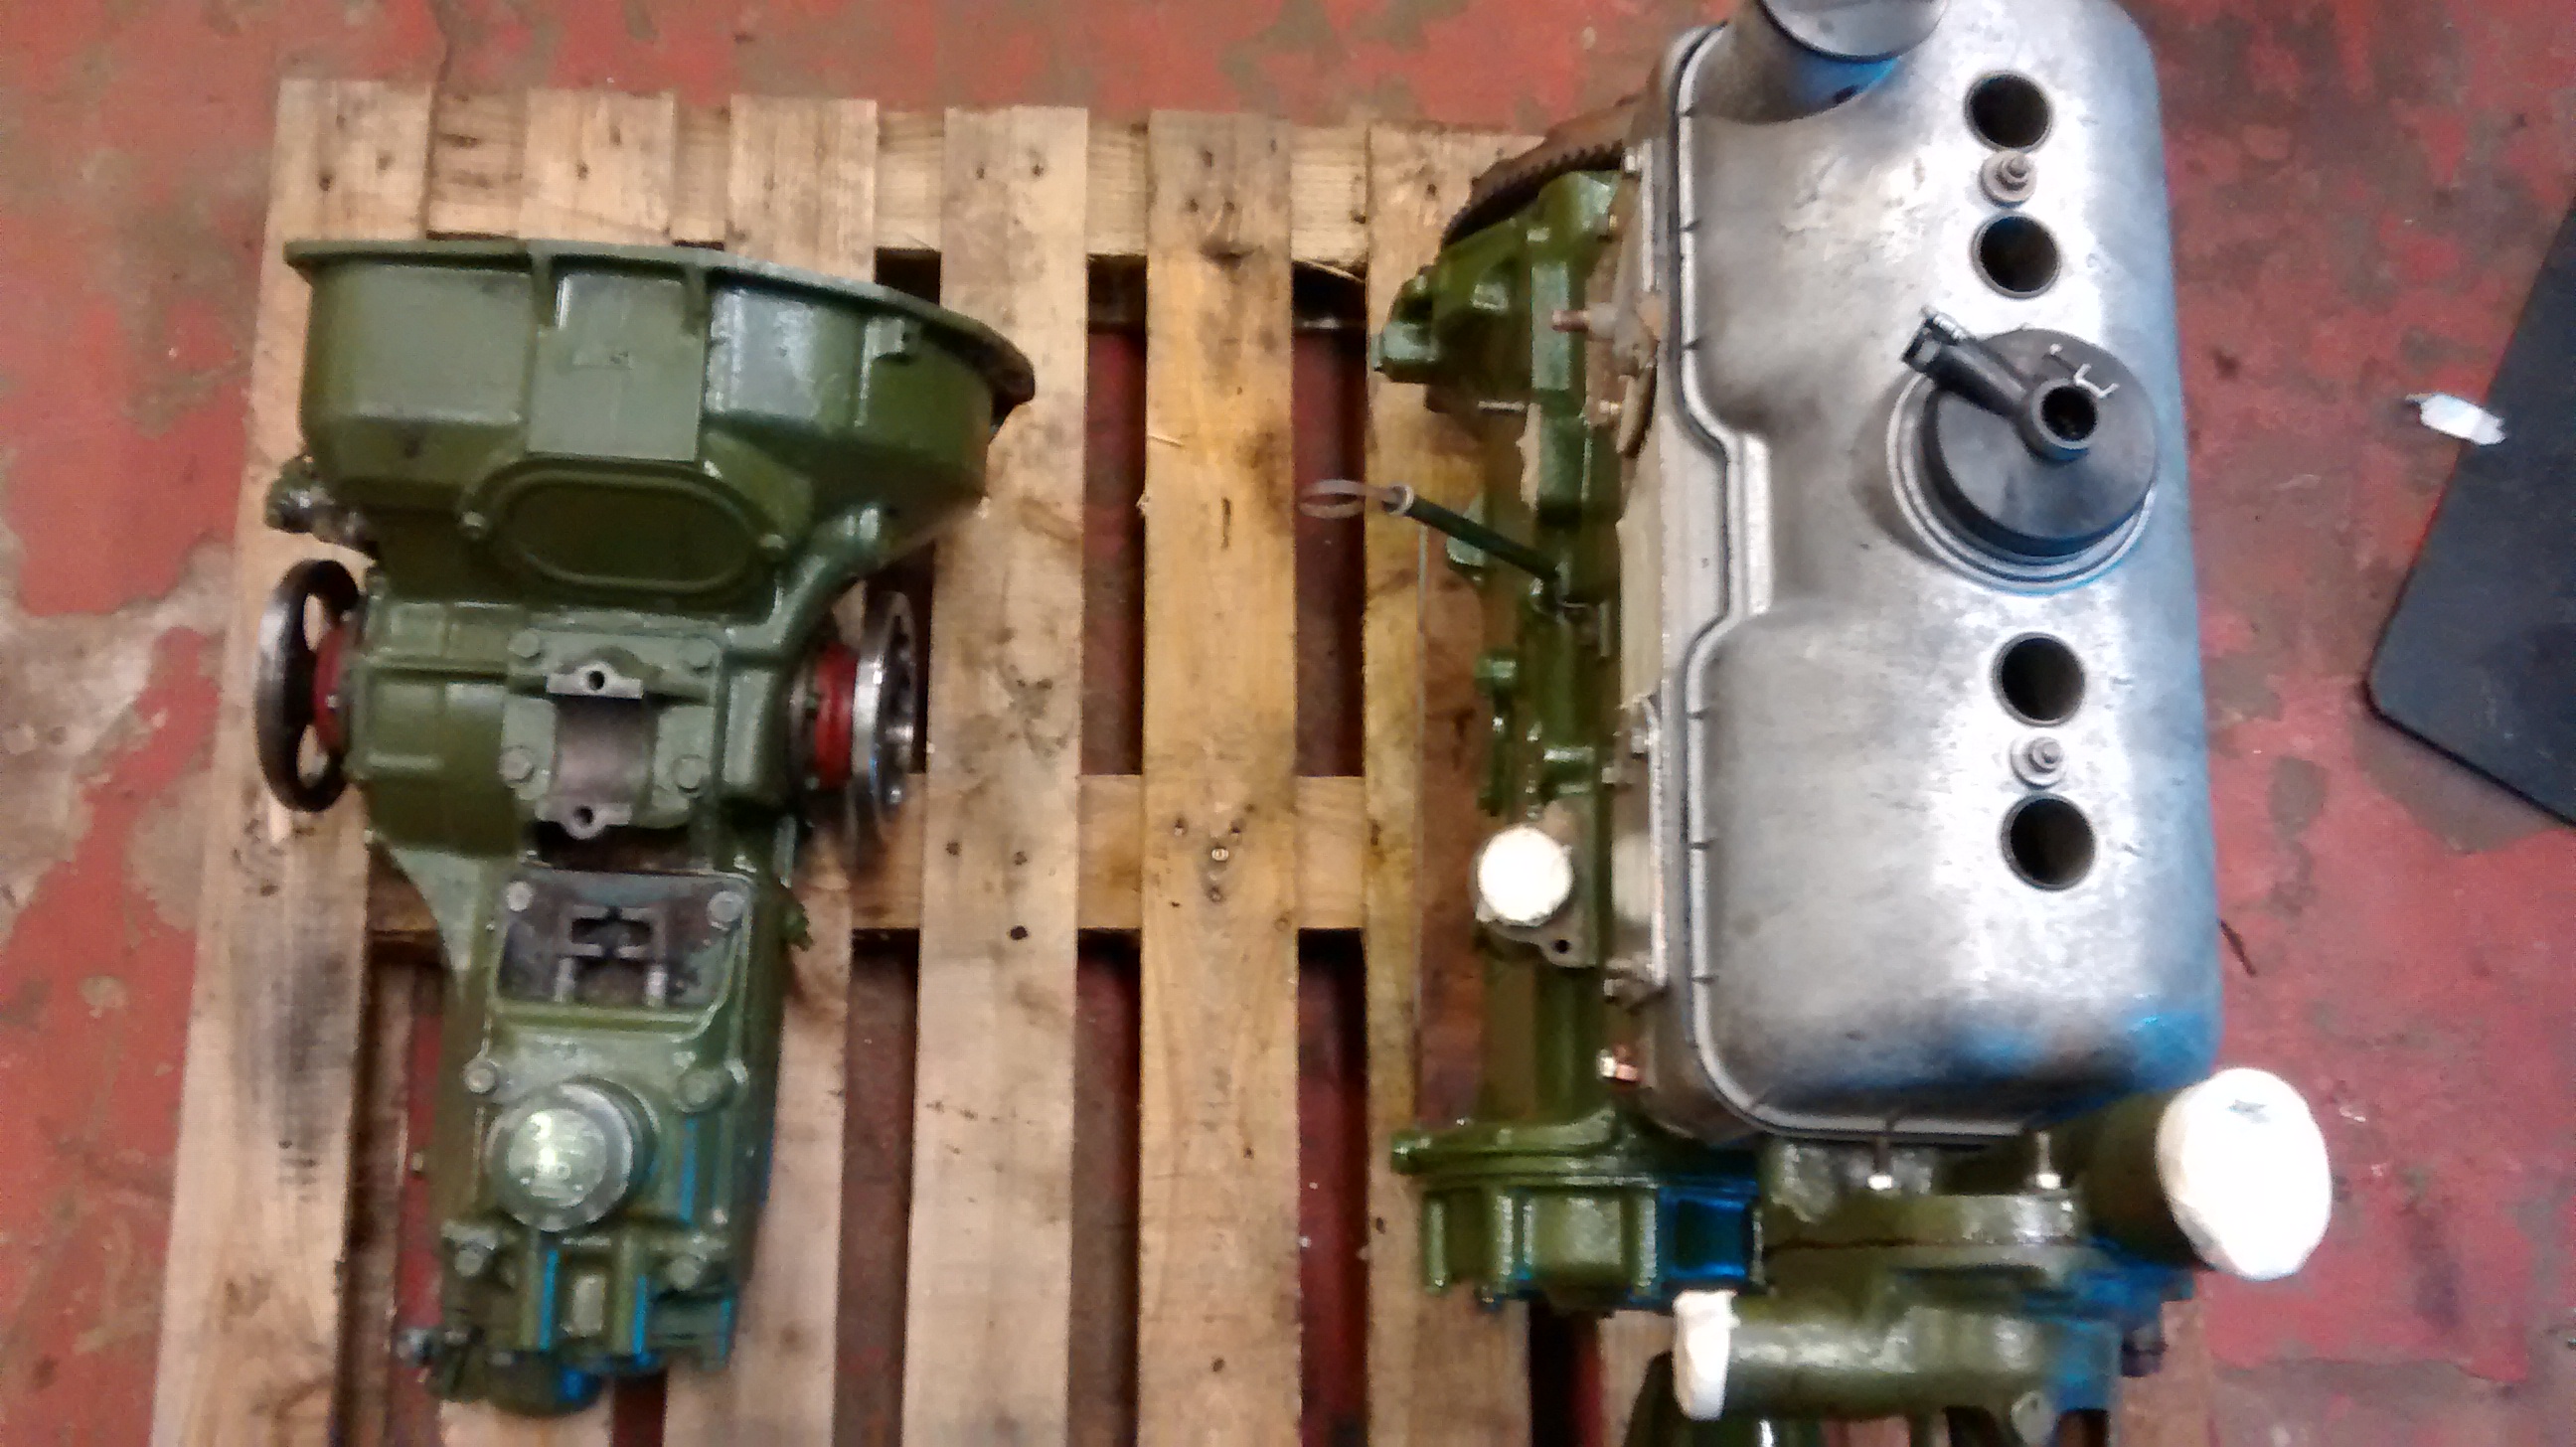
Below is a Rebuilt H van engine and Gearbox, all done in house, waiting to go to a customer :