Updated : 31/12/2018
Motorhome/Caravan Solar Panels And Suggested Fitting Method.
There are a growing number of reports of Solar panels detaching and taking flight while driving, like this forum thread which contains four separate instances :-
https://www.motorhomefun.co.uk/forum/threads/solar-panel-blown-off-roof.186806/The Post on the Forum high lights the use of inappropriate adhesives and practices. One example had so little surface area of attachment that the paint gave way, peeling off with the panel.
If you browse the web looking for instruction videos etc many are also propagating the use of poor practice and materials, search out the one from MMM TV and see how it breaks every common sense practice.
We have therefore tried to create a web page on fitting Solar panels to Motorhomes and Caravans for those with the necessary skills.
What adhesive should I use to attach my Flexi Solar Panel?
According to Sika, most types of Flexi Panel have fairly "exotic" plastics on the rear of the panel making them unsuitable for fixing with many Adhesives so you need to take specialist advice.
Because of a Flexi Solar panels disappointing performance and generally shorter useful life, they are out of the scope of this web page.
What adhesive should I use to attach my Flat Glass Solar Panel?
A motorhome travelling at 70mph into a 40mph head wind, effectively has a 110 mph hurricane blowing across the roof top. That can be a huge force acting on a Solar panel so we think 'belt and braces' security should be the order of the day.
We suggest Sikaflex 292i which is described as a "HIGH-STRENGTH FASTENING ADHESIVE FOR STRUCTURAL ASSEMBLY". It is suitable, even in challenging Marine environments.
Many forums advocate the use of Sikaflex 512 Caravan Sealer.adhesive which is primarily a sealant that also has some bonding properties. Sika say it is NOT a structural adhesive.
Sikaflex 292i is a full marine grade structural adhesive, not that different to Sikaflex 252, but 292i has superior Salt water and chemical resistance and 3 times less shrinkage than the 'best of the rest' so far less chance of there being gaps letting water in the roof.
Sikaflex 552 also gets a recommendation by the Sikaflex team, but the tensile strength of 292i is slightly superior.
Note that neither Sikaflex 252 or 292i are suitable for gluing all Plastics, 252 has a warning that any plastic under stress and potentially subject to stress cracks, MUST NOT be used with 252. The same applies to 292i.
Some of the adhesives specifically mention they are not suitable for ABS plastic which was the material used by one set of feet we saw.
Other adhesives, like the Dekasyl MS2, have notes in the documentation that they are also unsuitable to bond some plastics, like ABS.
There is also a growing trend for the Plastic Bracket manufacturers to include the Release Agent as part of the mix, not as a coating. Obviously a 'slippery' plastic will release easily from any mould, speeding up the manufacture process. But that means no amount of preparation or abrading of the surface will work. If the release agent is part of the plastic, just removing the surface will also reveal more release agent.
Therefore we suggest that, because you can't be sure what Plastic material is used, or what other materials are in the Plastic mix, that you play safe and only use Aluminium brackets.
You may note that in the incidents that have reported Solar panels taking flight or coming loose, it is with Plastic Brackets. They usually break free at the joint between the Plastic Bracket and the adhesive. Most report the adhesive still firmly attached to the roof.
Aluminium is described as 'particularly' suitable for bonding with Sikaflex 292i, as it is with most quality adhesives, it is safer to use this material than a plastic that may or may not stick.
In any case all Plastics are known to deteriorate with time. You will have seen how they go brittle after a few years, yet Motorhomes can have 40 year lives.
We know from past experience that, on a Motorhome or Caravan, Aluminium out lives almost anything, so that is the only material we suggest you use for the brackets.
Most of these types of adhesive are more susceptible to 'tearing', i.e, lifting of the bracket at one end, therefore the brackets you use should ideally be employed along the front and back of the panel where there is the greatest load, with additional supporting 'L' brackets at 30cm intervals along the sides.
The bracket feet should have a decent surface area to ensure there is adequate adhesion to the vehicle roof. This is important to ensure the Paint on the Roof is not so over stressed that it breaks away from the metal roof.
We suggest Aluminium brackets along the entire front of the panel to help reduce wind lift as well as intervals at the sides. Even better would be the 'Spoiler' brackets that prevent air getting under the panel,
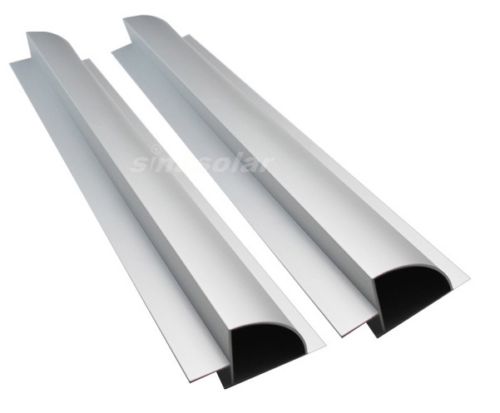
Maybe something like those above, see here for a supplier -
https://www.novaleisure.com/store/category/753/product/30666.aspxScrews should also be used, see the next section on how to use these screws when fitting the panel to the motorhome roof. We suggest these : https://tradefixdirect.com/self-drilling-screws/stitching-screws-16mm-washer-63-x-22mm-1
The above screws have a load spreading washer and an EDPM seal that not only helps stop water penetration but will allow 'movement', like expansion in the temperature extremes some Motorhome roofs experience. They are self drilling into steel and aluminium (no need to drill holes) so these work for both Steel roof PVC's and Alloy skin Motorhomes.
The almost total lack of the adhesive shrinkage of Sikaflex 292i (best in class), plus the use of a special screw with a flexible seal along with the technique we suggest below, should mean we have taken every care to ensure, absolutely zero water gets through.
Fitting a Solar Panel.
Not all Caravan/Motorhome roofs can take the weight of a small child, let alone an adult.
This section assumes that the fitter has researched safety when working on a motorhome/caravan roof and the issues involved with load capabilities of the roof, etc.
It also assumes that the fitter has read the detailed instructions that came with the Adhesive. Particularly with regard to Bead thickness, temperature and curing times.
The below process only applies to Motorhome's with roof's constructed of GRP, Fibreglass, Aluminium, Painted Aluminium Steel or painted Steel.
For anything else take advice.
Start by 'Dry fitting' the Solar panel to the roof by attaching the brackets to the Solar panel but not using any adhesive just yet.
Think about where the cable will run down into the vehicle, ideally you want it near'ish to one of the Solar Panel side mounting brackets so it can be cable tied to keep it secure, Also consider using Sikaflex to bond a cable tie to the roof just under the panel to stop the cable connectors flapping and damaging the roof.
Mark up where the cable will run down into the van and drill a pilot hole, using very narrow drill so the hole is easy to refill if a mistake is made. Measure the depth of the hole and compare it to the screws we will use to ensure they don't penetrate the interior. Take into account that the adhesive bead may be several mm thick. If there is a risk, select a shorter screw.
Check that the panel sits flat on the roof without placing any strain on the Solar Panel.
Once you are happy the panel sits right, using felt tip pen, draw an outline around the brackets and circle on the brackets where you intend to drill the holes through the brackets to mount it on the roof, but don't drill them yet. The felt tip outline will become the guide for the adhesive.
Maybe also put masking tape around the outline as this protects the area while you do the surface preparation and will also take any excess adhesive with it when the masking tape is taken up at the end of the job.
Remove the panel back to the work bench and drill the holes you want in the brackets that will go through the roof to supply additional mechanical fixing. We don't need to drill the roof because we are using Self Drilling screws.
Do whatever preparation is required in the manufactures instructions to both the roof and the brackets, this part is really important for maximum adhesion.
Remember, if the Dealer has applied a Paint protection coating, like DiamondBrite, Paintseal, etc. that layer MUST be removed by very careful cleaning and/or abrasion.
When abrading the Paint on the Roof, do not damage the paint surface, just a light roughening that makes the Paint 'Dull'. 'Washing Up' Green scourers are perfect. Do not use Wire Wool.
Sika have asked me to stress how important this part is, it is THE difference between something that sticks well and something that doesn't.
Read the instructions very carefully.
When used in this EXACT application described here, Sika 292i does not need any special preparation Primer but it is important the surfaces are scrupulously clean.
Sika say -
"Surfaces have to be dry, oil, fat and dust free. Soiled substrates can be cleaned with Sika® Remover-208. According to the nature of soiling, other methods such as water based cleaners, steam washer, etc. may be used".
If the surface is particularly Oily or contaminated with wash/wax, Silicone treatment or some special Paint protector like Paintseal, etc, then use Sika 208 remover/cleaner prior to abrasion.
It is suggested that once cleaned, you also lightly abrade the surfaces using a fine scourer, like the 'Green Washing Up' pads, but not Brillo or Steel wool. This is only light abrasion on both the roof paint, Gel coat or GRP and the Aluminium strips/brackets.
Once absolutely perfectly clean get your spacers ready to stop the Adhesive bead collapsing and 'squashing out',.
Spacers
When the panel is placed on top of the bead, we don't want it to sit so far down it squeezes out all of the adhesive, we need between 5mm and 6mm of adhesive, ideally at least 4.5 mm, to remain between the Roof and the bracket after it is screwed in place.
One Adhesive expert recommends 6mm wide Petrol pipe cut into 5.5 mm - 6.0 mm long 'tubes' that then sit 'on end' in the adhesive as these are firm but flexible and allow more movement should the adhesive need to flex.
The panel does not need to flex much up or down, but side ways and these rubber 'tubes' bend side to side well. Sika advise against hard plastic tile spacers because movement is more restricted.
At £4 for a 1 metre length this 6mm rubber hose (6mm internal diameter 13mm external) from Halfords, it is both easy to acquire and cheap.
Or Amazon sell similar at £2.50/metre - https://www.amazon.co.uk/FUEL-TEMPERATURE-DIESEL-INJECTION-FUEL-OFF/dp/B00IPKNKVS/ref=pd_lpo_vtph_263_tr_t_2?_encoding=UTF8&psc=1&refRID=QW378D4ASE2WGKDYT977
Make sure that whatever separators you use, they are evenly spaced at about 8" intervals.
You have only 40 minutes working time with Sikaflex 292i, so make sure everything is ready for the next steps.
Go through the next steps before you start running the adhesive bead to ensure everything you will need is within reach.
Now run a fat bead of adhesive inside the felt tip outline. You are aiming for a bead about 8 - 9 mm high. Placing one of the rubber tube spacers into the bead now helps you gauge how high and wide it needs to be. Add a second bead if necessary.
Sikaflex 292i has one of the lowest 'Sag' rates, so the bead of adhesive should not 'collapse', which can happen with lesser adhesives.
To repeat again, you have a MAX 40 mins after the bead is first squeezed from the tube to the point of tightening down all the screws, so make sure everything is ready before you start running the Sikaflex bead.
Ensure the bead is several millimetres inside the felt tip outline to allow for it spreading outwards when compressed.
Lift the Solar Panel into place on to the bead of adhesive but DO NOT apply any pressure at this stage.
Check the Solar panel is correctly in place and insert your first self drilling/threading screw in place but don't tighten it fully, just in so far it almost touches the Panel Brackets without compressing the Bead of adhesive.
We want the adhesive to be carried into the holes in the roof to both seal the hole and effectively 'bond from the inside', so we only loosely fit all the screws at this stage.
Once all screws are loosely in place. remove them one by one, squirt Adhesive into the hole and tighten the screw so it just touches down on the Solar panel bracket.
Then once they are all in place, tighten each screw just one half turn each as you go clockwise around the panel until the panel is sitting on the Spacers. This ensures the adhesive sticks to the screw thread to be carried into the hole evenly around the panel and that we now have a good 4.5 mm - 6 mm thickness of adhesive between the Roof and the Solar panel brackets.
When the adhesive on both sides of the Roof hole sets, it will reinforce the hole, so even though the screw is into 'thin aluminium', it will be strong.
Do not overtighten, the screws should just apply gentle pressure to the the Solar panel bracket. If you do them too tight they will just compress the Adhesive Bead too much and pull out of the thin aluminium roof at this stage.
Wire up the Solar panel, see here for more Hints and Tips : http://www.aandncaravanservices.co.uk/solar-power.php
Allow at least four days for the Bead to Cure before moving the motorhome, an even greater time in low temperatures.
Sikaflex 292i cures by absorbing moisture from the air, so should cure faster on a warm damp day than a dry one.
The ideal installation temperature is 10 - 40 degrees. In daytime temperature of 10 degrees, allow at least 10 days to cure before moving the motorhome. Remember that a daytime 10 degrees can mean a long nighttime at 5 degrees or less.
When it is very cold there will be less moisture in the cold air, so curing may not occur at all.
It is very, very important the vehicle is not moved because the bouncing of the vehicle over bumps will cause the Solar Panel to compress down and up on the Adhesive bead while it is in a partially cured state. This may weaken the joint and or allow gaps.
Sika have asked us to stress the importance of allowing lots of time for curing, if in doubt double the time.
To those who say you don't need screws as a back-up, can I ask you how they calculated that the paints adhesion to the metal roof is sufficient? There have been reports of paint being peeled off motorhome roofs when the Panel detaches, so while some might have exceptional adhesion that will take a Solar panel, some might not.
Also how do you know the Adhesive won't degrade the paint after 6 years such that the paint peels off? Little is known about the long term reaction of modern adhesives, paint work and plastics. On motorhomes that can have a live of 30 years, caution is obviously advised.
It may, or may not work out fine, but aren't a few screws good insurance?
Existing installations that might not be secure?
If you have plastic brackets and want to ensure your Solar Panel is safe, then fitting Aluminium brackets along the front and rear of the panel using the above technique will add masses of strength to the existing fixings. If a Spoiler type bracket won't fit, then use multiple 'L' shaped brackets an inch apart.
By the 'front' we mean that facing the front of the vehicle.
The above technique is for fitting Solar panel brackets that you never want to remove.
How many brackets do I need?
The number of brackets will depend on the Solar Panel size and how much adhesion you can get from the paint on the roof, etc.
There is no definitive answer as it will depend on many factors from the Motorhome roof design and the air turbulence over it to the quality of the Paint and how strongly the paint adheres to the metal roof. Even how fast you drive will be a factor.
It is an assessment you need to make, but we would suggest a 4 inch long aluminium 'L' bracket every 8 - 12" on most of the Solar panel except the front and rear.
Along the front and rear where there will be greater strain on the Solar Panel, we would suggest full width 'Spoiler' types of bracket. Using multiples of these if the panel is wide.
The advantage of the Spoiler bracket is that they reduce 'lift' from air getting under the panel and have a big footprint for plenty of Adhesive to grip the roof. That will reduce the likely hood of the Paint breaking away. That is obviously a greater risk with the small surface area of the small 'foot' of a 2" bracket.
There will still be lift from the air flowing over the panel, but it should be reduced considerably if the air is prevented from getting under the panel.
If you don't use a spoiler bracket then consider using multiple 4 inch 'L' brackets right across the front with 1" gaps between each one.
The above is only a guide and the reader should take every care to ensure they have both the skills and knowledge to complete the task.
Suggest you ensure your professional installer uses similar practices.
If you want to see if they have installed yours correctly, then an easy way is to look at the thickness of adhesive between the roof and the bracket feet. Sika advise that brackets should have a very thick adhesive layer to allow for expansion, around 6mm, depending on the loading.
If yours uses Plastic Brackets and the layer of adhesive looks very thin or you are aware that a Structural Adhesive wasn't used then maybe think about asking for extra re-inforcement?
Mono-Crystalline panels are smaller than the equivalent Poly Panel for the same output but the output current is still similar.
The greater efficiency of a 100w Mono panel means it uses a smaller area to produce the same power as a 100w Poly panel.
For example a 100w mono panel will be, roughly, about 1,100mm x 650mm whereas a 100w Poly panel will be about 1,200 x 800mm. Both produce around 5amps of power in bright light and cool conditions.
Mono panels are often slightly dearer.
So if space is not an issue you may save by adopting a Poly panel. Note that some Solar Panels advertised as Mono are sometimes Poly, check the physical size is equivalent to a similar output Mono panel.
Note that a Solar panel is more efficient at lower temperatures so ideally you should provide an air gap below the panel for cooling.
One of the reasons why semi-flexible panels are disappointing performers in bright sunny conditions is the heat build-up due to a lack of air space below the panel as these flexible panels are normal bonded directly to the roof.
It has become quite common knowledge that flexible panels use, to quote an adhesive expert, "exotic materials that are challenging to Adhesives" so be aware they need very special attention when fixing.
In addition, flexible panels use a less transparent plastic for the top, not Glass as obviously Glass doesn't bend, resulting not only in a less efficient panel with lower light transmission, but faster degradation as the light transmission is blocked as the panel is used. You may have seen how Car Plastic headlights discolour with time?
Shade on a Solar Panel
When a small part of a Solar Panel goes into shade, those cells stop generating Electricity and instead draw it from the surrounding cells, in effect becoming a heater element. The amount of power drawn is often directly proportional to the quality of the panel. It only requires a small shadow over just 5% of the Panel to drop Power output by 40%.
This webpage information, supplied by Plwsm2000 from the MMM Out And About Live Forum, answers a whole host of Solar Panel questions :
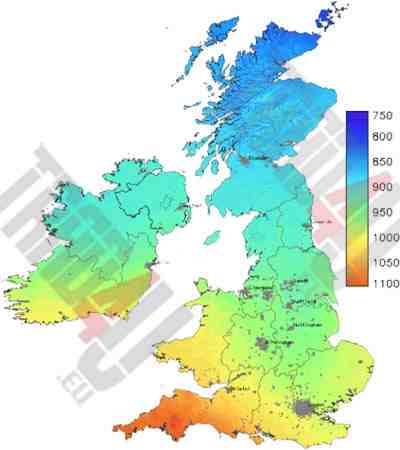
See this chart below that shows how the power generating capability of a Solar Panel varies significantly between the South coast of Cornwall and the North coast of Scotland -

|
Blue Sky SB2000E mppt-solar-charge-controller-manual.pdf Size : 446.797 Kb Type : pdf |